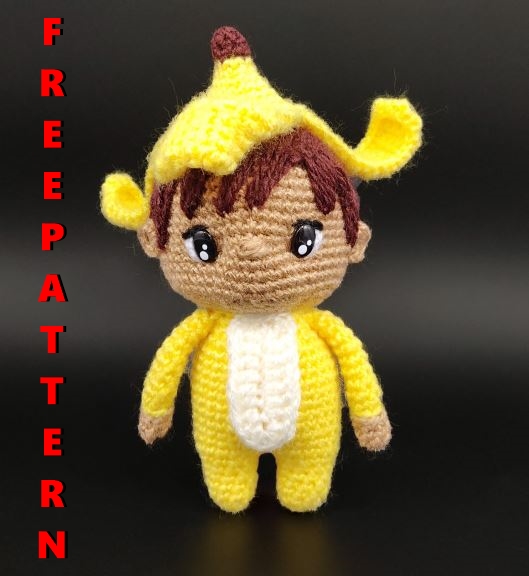
Amigurumi Banana Boy Free Pattern
Hello dear visitors, I am here again with new amigurumi molds for you. I am sharing amigurumi patterns for you here for free. You can make your children happy by making these patterns. Amigurumi toys are very popular lately and are the most beautiful toys that don’t harm your kids. Your kids will love them. Let’s move on to our pattern and give them this gift.
Desinger : https://talesoftwistedfibers.wordpress.com/
This is an original pattern by Tales of Twisted Fibers
Materials
• Sock weight yarn in yellow, light brown, dark brown,
ivory, small lengths of yarn in black and white for eye
details
• 2.5mm hook
• a pair of 10mm oval eyes
• Stitch markers
• Polyester fiberfill for stuffing
• Yarn needle
• Pearl headed pins
• A pair of scissors
Terminology [US]
magic ring
ch (chain / chains)
st (stitch / stitches)
sc (single crochet)
hdc (half double crochet)
dc (double crochet)
inc (increase)
dec (decrease)
BLO (back loops only)
sl st (slip stitch)
Size: 16cm [approximately] when made with the indicated yarn
Difficulty Level: Easy
LEG (make 2)
Start with yellow yarn.
Rnd 1: 5 sc in a magic ring. [5]
Rnd 2: inc X 5. [10]
Rnd 3-6: sc around. [10]
Rnd 7: (sc, inc) X 5. [15]
Mark the next st.
Fasten off. Weave in the yarn end.
Make the second leg but do not fasten off. We will
join the legs in the next round.
BODY
Rnd 1: With the active stitch of the second leg
on your hook, sc on the marked st of the first
leg; sc on the remaining 14 stitches of this leg
and then continue making sc on all 15 st of the
second leg. [30]
Rnd 2: sc 14, inc X 2, sc 14. [32]
Rnd 3-11: sc around. [32]
Rnd 12: (sc 6, dec) X 4. [28]
Rnd 13: (sc 5, dec) X 4. [24]
Rnd 12: (sc 4, dec) X 4. [20]
Fasten off, leaving a long tail for sewing.
Stuff the legs and the body.
CHEST PATCH
Start with ivory yarn.
Ch 11. Starting from the 4th ch from the hook,
dc in the next 7 ch, 5 dc in the last ch. Continue
working on the other side of the foundation ch
and dc 7. [19]
Fasten off, leaving a long tail for sewing.
ARM (make 2)
Start with light brown yarn.
Rnd 1: 6 sc in a magic ring. [6]
Rnd 2-3: sc around. [6]
Join yellow yarn.
Rnd 4: BLO sl st around. [6]
Rnd 5: BLO sc around. [6]
Rnd 6-13: sc around. [6]
Fasten off, leaving a long tail for sewing.
HEAD
Start with light brown yarn.
Rnd 1: 8 sc in a magic ring. [8]
Rnd 2: inc X 8. [16]
Rnd 3: (sc, inc) X 8. [24]
Rnd 4: (sc 2, inc) X 8. [32]
Rnd 5: (sc 3, inc) X 8. [40]
Rnd 6: (sc 4, inc) X 8. [48]
Rnd 7-19: sc around. [48]
Rnd 20: (sc 4, dec) X 8. [40]
Rnd 21: (sc 3, dec) X 8. [32]
Rnd 22: (sc 2, dec) X 8. [24]
Insert 10mm black oval safety eyes between Rnd
14 & 15, 9 st apart.
Rnd 23: (sc, dec) X 8. [16]
Rnd 24: (sc 2, dec) X 4. [12]
Fasten off. Weave in the yarn end.
Stuff the head.
EYES
Indent eye sockets
Following this step will give the doll’s face some
definition.
Thread a yarn needle with light brown yarn or any
other color you have used for making the head.
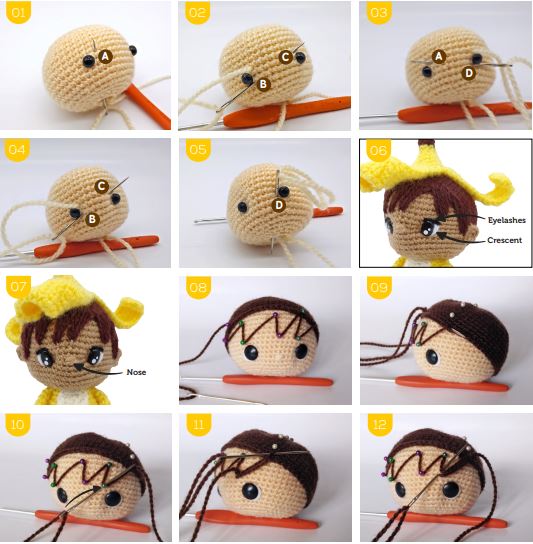
Insert the needle from the base of the head, bring
it out from Point A next to the eye [Pic 1]. Push
the needle back in from Point B and out from
Point C close to the next eye [Pic 2]. Push it in
from Point D, bringing it out from Point A again
[Pic 3]. Gently squish the eyes together with your
fingers and carefully pull the yarn to bring the
eyes closer. While holding this shape, push the
needle back in from Point B and out from Point
C [Pic 4]. Push it in from Point D, and bring it out
from the opening at the base of the head [Pic
5]. Gently pull both the yarn ends and tie them
together to hold the shape. Clip off excess yarn
and push the yarn ends inside the head.
Eye details: Thread a yarn needle with white
yarn and embroider a crescent shape around the
outer eye [Pic 6]. With black yarn, sew a horizontal
line above the eye, starting from the inner corner
of the eye and extending just beyond the white
crescent [see Pic 6 for reference].
NOSE
To make the nose, sew 4 to 5 short horizontal lines
between the eyes with light peach yarn [between
Rnd 14 & 15 of the head]. See Pic 7 for reference.
HAIR
Start with dark brown yarn.
Rnd 1: 8 sc in a magic ring. [8]
Rnd 2: inc X 8. [16]
Rnd 3: (sc, inc) X 8. [24]
Rnd 4: (sc 2, inc) X 8. [32]
Rnd 5: (sc 3, inc) X 8. [40]
Rnd 6: (sc 4, inc) X 8. [48]
Rnd 7-14: sc around. [48]
Fasten off, leaving a long tail for sewing fringe on
the forehead.

Slip the hair cap on the head. Make sure the yarn tail
is aligned with the doll’s left eye. Using pearl headed
pins, mark the area on the forehead where the fringe
will be embroidered [see Pic 8 for reference]. First,
weave the remaining yarn tail around these pins to
create a zigzag outline for the fringe that will cover
the entire right side of the forehead. Secure it with
a single stitch on the hair piece. Do not take out the
pins yet; we will need them to hold the outline. Push
needle all the way back to the starting point [Pic 9].
Now we will start embroidering hair, one cluster
at a time. With your yarn needle, make a stitch at
the lowest point of the first inverted triangle on the
outline [Pic 10]. Make sure the needle goes beneath
the yarn that serves as your outline and through
one stitch on the head. Make the next stitch on
the hair cap, right next to the point where the first
diagonal hair strand begins [Pic 11]. The idea is
to keep sewing these lines within the outline you
created until you cover the entire right side of the
forehead [Pic 12].
Similarly, create an outline with pearl headed pins
on the left side of the forehead and make the fringe.
EAR (make 2)
In a magic ring, [sc, hdc, 2 dc, hdc, sc] to create
a semicircle. Fasten off, leaving a long tail for
sewing. Sew ears on the head.
BANANA PEEL HAT
Start with dark brown yarn.
Rnd 1: 6 sc in a magic ring. [6]
Rnd 2-3: sc around. [6]
Join yellow yarn.
Rnd 4: (sc 2, inc) X 2. [8]
Rnd 5: sc around. [8]
Rnd 6: inc X 8. [16]
Rnd 7: sc around. [16]
Rnd 8: (sc, inc) X 8. [24]
Rnd 9: sc around. [24]
From here on, we will work in rows.
*Row 1: sc in the next 8 st, mark the next st, ch 1,
turn. [8]
Row 2-3: sc 8, ch 1, turn. [8]
Row 4: sc, dec, sc 2, dec, sc, ch 1, turn. [6]
Row 5-7: sc 6, ch 1, turn. [6]
Row 8: sc, dec X 2, sc, ch 1, turn. [4]
Row 9-18: sc 4, ch 1, turn. [4]
Row 19: sc, dec, sc, ch 1, turn. [3]
Row 20-21: sc 3, ch 1, turn. [3]
Fasten off, weave in the yarn end.
Join yellow yarn on the marked st.**
Repeat from * to ** two more times.
Join yellow yarn at any point between the two
strips of banana peel and sc along the row ends,
making 1 st per row. At the tip of the peel (Row
21), dec 1, sc in the next st. Continue making sc
along the next row end. Do this for all three strips
of the banana peel.
Fasten off, weave in the yarn ends.
ASSEMBLY
• Pin the head on the body and sew them together.
• Sew arms on the last round of the body.
• Sew chest patch on the body.
• Pin the banana peel hat on the head and sew
in place.
