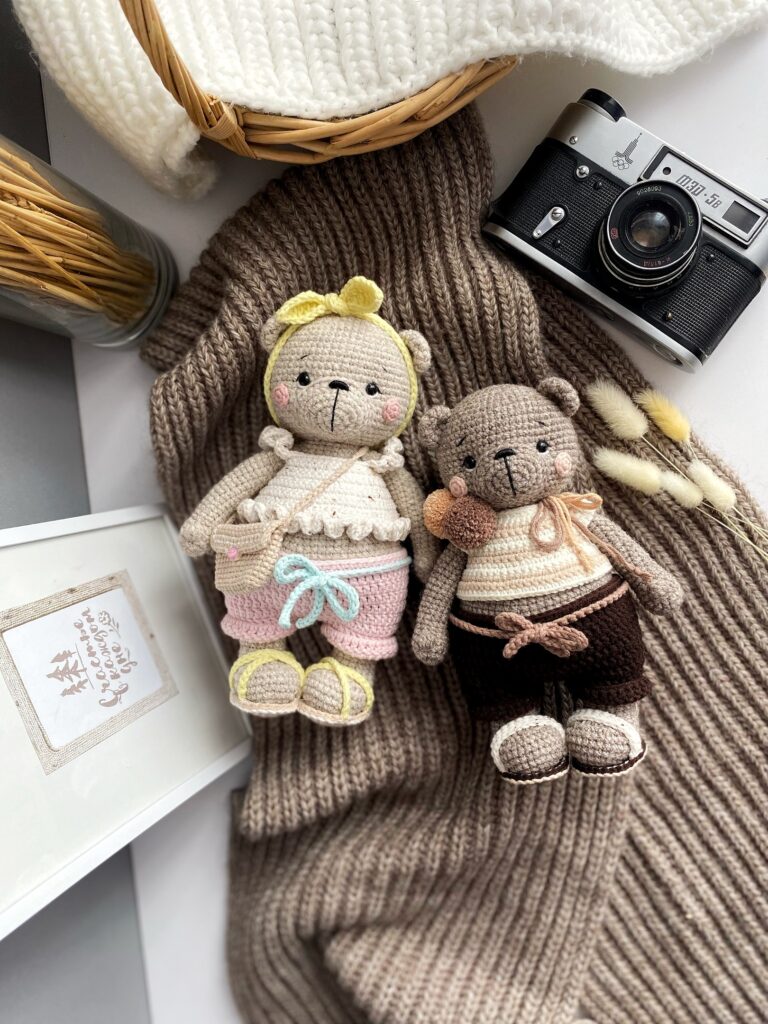
Cute Crochet Michelle and Martin Bear Amigurumi Free Pattern
Hello dear visitors, I am here again with new amigurumi molds for you. I am sharing amigurumi patterns for you here for free. You can make your children happy by making these patterns. Amigurumi toys are very popular lately and are the most beautiful toys that don’t harm your kids. Your kids will love them. Let’s move on to our pattern and give them this gift.
Tools & Materials:
— Yarn
Michelle:
— DK Light Worsted/8ply yarn Alize Alpaca
Royal (100 g/ 250 m) color #152 for the body;
— Fine/4ply yarn Alize Cotton Gold Tweed
(100 g/ 330 m) color #62 – for the top and
sandals;
— Fine/4ply yarn Yarn Art Jeans (50 g/ 160 m)
color #18 – for the shorts;
— Fine/4ply yarn Yarn Art Jeans (50 g/ 160 m)
color #67 for soloha headband and sandals;
— Fine/4ply yarn Yarn Art Jeans (50 g/ 160 m)
color #87 – for the bag and sandals;
— Fine/4ply yarn Yarn Art Jeans (50 g/ 160 m)
color #83 – for the cheeks;
— Fine/4ply yarn Alize Cotton Gold (100 g/
330 m) color #522 – for the ties.
Martin:
— DK Light Worsted/8ply yarn Alize Alpaca
Royal new (100 g/ 250 m) color #695 for the
body;
— Fine/4ply yarn Alize Cotton Gold (100 g/
330 m) color #26 – for the shorts and slippers;
— Fine/4ply yarn Yarn Art Jeans (50 g/ 160 m)
color #03 – for the T-short and slippers;
— Fine/4ply yarn Yarn Art Jeans (50 g/ 160 m)
color #87 for the T-shirt;
— Fine/4ply yarn Yarn Art Jeans (50 g/ 160 m)
color #07 – for the pompoms;
— Fine/4ply yarn Yarn Art Jeans (50 g/ 160 m)
color #71 – for the pompoms and ties;
— Fine/4ply yarn Yarn Art Jeans (50 g/ 160 m)
color #83 – for the cheeks.
— Hook size 2 mm
— Stuffing material – fiberfill
— Eyes size 7 mm
— Black cotton thread to embroider the nose and eyebrows
— Thick and thin needle for sewing pieces
— Scissors
— Sewing pins
— Stitch marker (can use a thread in a contrasting color)
— Buttons size 9 mm – 2 pcs.
— Button size 6 mm (for the soloha)
— Paper tape or adhesive plaster
— Wire
— White thread to embroider the whites of the eyes
The pattern does not contain crochet lessons and is designed for those
who have basic crochet skills. The difficulty level – intermediate.
The size of the finished toy when using the indicated materials is about
20-21 cm.
Abbreviations
MR – magic ring;
sc – single crochet;
sl st – slip stitch;
inc – increase (2 sc in one stitch);
dec – decrease (2 sc together in front loops);
3 sc inc – crochet 3 sc in one stitch;
ch – chain;
dc – double crochet;
dcinc – double crochet increase (2 dc in one stitch);
tr – treble crochet;
hdc – half double crochet;
hdcinc – half double crochet increase (2 hdc in one stitch);
Bobble st – crochet the indicated number of unfinished DC stitches in
one stitch with a common top;
(…) * N – work instruction in brackets N times;
(N) – number of stitches in a particular row/round
Head:
Crochet with the main yarn.
1 Rnd. 6 sc in a MR
2 Rnd. 6 inc (12)
3 Rnd. (1 sc, inc)6 (18)
4 Rnd. 1 sc, inc, (2 sc, inc)5, 1 sc (24)
5 Rnd. (3 sc, inc)6 (30)
6 Rnd. 2 sc, inc, (4 sc, inc)5, 2 sc (36)
7 Rnd. (5 sc, inc)6 (42)
8 Rnd. 3 sc, inc, (6 sc, inc)5, 3 sc (48)
9 Rnd. (7 sc, inc)6 (54)
10 Rnd. 4 sc, inc, (8 sc, inc)5, 4 sc (60)
11-22 Rnds. 60 sc (12 rounds)
23 Rnd. 4 sc, dec, (8 sc, dec)5, 4 sc (54)
24 Rnd. (7 sc, dec)6 (48)
25 Rnd. 3 sc, dec, (6 sc, dec)5, 3 sc (42)
26 Rnd. (5 sc, dec)6 (36)
27 Rnd. 2 sc, dec, (4 sc, dec)5, 2 sc (30)
28 Rnd. (3 sc, dec)6 (24)
Fasten off and cut the yarn, leaving a long end for sewing pieces. Stuff the
head tightly with fiberfill.
Ears (make 2):
Do not stuff.
Crochet with the main yarn.
1 Rnd. 6 sc in a MR
2 Rnd. 6 inc (12)
3 Rnd. (3 sc, inc)3 (15)
4 Rnd. 15 sc
5 Rnd. (3 sc, dec)3 (12)
Fasten off and cut the yarn, leaving a long
end for sewing pieces
Arms (make 2):
Prepare 2 pieces of wire 20 cm long in advance, bend one end, as per the
photo, and wrap it with paper tape or adhesive plaster
Right arm. Crochet with the main yarn.
1 Rnd. 6 sc in a MR
2 Rnd. 6 inc (12)
3 Rnd. (3 sc, inc)*3 (15)
4 Rnd. 15 sc
5 Rnd. 4-dc Bobble st, 14 sc (15)
6 Rnd. dec, 6 sc, dec, 5 sc (13)
7 Rnd. dec, 5 sc, dec, 4 sc (11)
Insert a wire into the arm and stuff it with fiberfill. Continue crocheting
the arm, stuffing as you go. Do not stuff the upper arm.
8-26 Rnds. 11 sc (19 rounds)
Crochet 2 extra sc (you may have a different number of stitches) so that
the thumb is on the side, when flatten the arm in half.
Fasten off and cut the yarn, hide the ends inside.
Crochet the left arm in the same
way, except round 5:
5 Rnd. 7 sc, 4-dc Bobble st, 7 sc (15)
Muzzle:
Crochet with the main yarn.
1 Rnd. 6 sc in a MR
2 Rnd. 6 inc (12)
3 Rnd. 2 sc, (3 sc inc)2, 4 sc, (3 sc inc)2,
2 sc (20)
4 Rnd. 4 sc, 3 inc, 7 sc, 3 inc, 3 sc (26)
5-6 Rnds. 26 sc
Fasten off and cut the yarn, leaving a
long end for sewing pieces.
Cheeks (make 2):
Crochet with pink yarn.
1 Rnd. 6 sc in a MR
Fasten off and cut the yarn, leaving a
long end for sewing pieces
Legs & Body:
Crochet with the main yarn. Stuff tightly as you go.
Ch6.
1 Rnd. start on the second chain from
the hook: 4 sc, 3 sc in the last chain, on
the other side of the chain: 3 sc, inc (12)
2 Rnd. inc, 3 sc, 3 inc, 3 sc, 2 inc (18)
3 Rnd. 1 sc, inc, 3 sc, (1 sc, inc)3, 3 sc, (1 sc, inc)2 (24)
4 Rnd. 2 sc, inc, 3 sc, (2 sc, inc)3, 3 sc, (2 sc, inc)2 (30)
5-7 Rnds. 30 sc (3 rounds)
8 Rnd. 6 sc, (dec, 1 sc)6, 6 sc (24)
9 Rnd. 5 sc, 6 dec, 7 sc (18)
10 Rnd. 6 sc, 2 dec, 8 sc (16)
11-14 Rnds. 16 sc (4 rounds)
15 Rnd. (3 sc, inc)4 (20)
16-17 Rnds. 20 sc (2 rounds)
Crochet a few extra sc so that the marker is on the side (I have 5 sc).
The legs should look at each other. Finish crocheting with sl st, fasten off
and cut the yarn, hide the ends inside.
Crochet the second leg in the same way as the first, only after Rnd 17 work
a few extra sc (I have 13 sc). Do not cut the yarn, but continue to crochet
the body. Stuff with fiberfill as you go.
18 Rnd. ch6 from the second leg, join the first leg with sl st, in the next
stitch after sl st on the first leg and place a marker (make sure that the legs
look at each other). Next, 20 sc on the first leg, 6 sc on the chain, 20 sc on
the second leg, 6 sc on the chain (52)
19 Rnd. 20 sc, (1 sc, inc)3, 20 sc, (1 sc, inc)3 (58)
20 Rnd. 9 sc, inc, 28 sc, inc, 19 sc (60)
21 Rnd. (9 sc, inc)6 (66)
22 – 31 Rnds. 66 sc (10 rounds)
32 Rnd. (20 sc, dec)3 (63)
33 Rnd. (19 sc, dec)3 (60)
34-35 Rnds. 60 sc (2 rounds)
36 Rnd. (18 sc, dec)3 (57)
37 Rnd. (17 sc, dec)3 (54)
38 Rnd. 54 sc
39 Rnd. (7 sc, dec)6 (48)
40 Rnd. 48 sc
41 Rnd. (6 sc, dec)6 (42)
42-43 Rnds. 42 sc (2 rounds)
Stuff tightly as you go.
44 Rnd. (5 sc, dec)6 (36)
45 Rnd. (4 sc, dec)*6 (30)
In the next round, join the arms.
Make sure that they are
symmetrical, you may have a
different distribution of stitches.
46 Rnd. 6 sc on the body, 5 sc on the inner part of the arm and body,
10 sc on the body, 5 sc on the inner part of the arm and body, 4 sc on
the body (30)
47 Rnd. 6 sc on the body, (2 sc, dec, 2 sc) on the outer part of the arm,
10 sc on the body, (2 sc, dec, 2 sc) on the outer part of the arm, 4 sc on
the body (30)
Connect the two ends of the wire together and wrap them with paper
tape or adhesive plaster.
48 Rnd. (3 sc, dec)*6 (24)
49 Rnd. 24 sc
Crochet a few extra sc to finish on the side.
Fasten off and cut the yarn, hide the ends inside
Tail:
Crochet with the main yarn
Do not stuff.
1 Rnd. 6 sc in a MR
2 Rnd. 6 inc (12)
3 Rnd. 6 dec (6)
Fasten off and cut the yarn, leaving
a long end for sewing pieces.
Decoration & Assembly:
Decorate the head. Fix the muzzle to the head between rounds 17 and 28
with pins and sew as shown in the photo. Stuff with fiberfill in the
process.
Glue the eyes between rounds 18
and 19, the distance between them
is 8 sc (visible distance). I used
safety eyes. First, use a sushi stick
to make holes in the places where
the eyes are attached, then use a
hot glue gun to apply a little hot
glue to the holes and insert the legs
of the eyes. If desired, you can preinsert the safety eyes and secure
them with washers.
Sew the nose with a black cotton thread between rounds 5 and 6 of the
muzzle. Nose width 3 sc. Make 2 horizontal stitches, then wrap the nose
with vertical stitches with the same thread, inserting the needle from the
bottom up. Wind the thread around stitches until you reach the desired
thickness. Make a vertical stitch from the nose down (6-7 rounds long).
Make eyes needle sculpting,
focusing on the photo. Insert the
needle with the thread through
the base of the head and exit it
through point 1. Then insert the
needle into point 2 and exit it
through the base of the head.
Pull both threads and tie a knot.
For strength, repeat the
tightening.
Similarly, tighten the second eye, but in this case, exit the needle and
thread through the base of the head at point 4. Then insert the needle
into point 3 and exit it again through the base. Pull both threads and tie
a knot. For strength, repeat the tightening.
Embroider the eyebrows with a black thread in round 15, the distance
between them is 10 sc, the width is 2 sc. Then embroider the eyelids
with a black thread.
Using a white thread, make stitches near the eyes to make the look more
expressive.
Fix the ears with pins on the sides of the head between rounds 8 and 15
and sew them on.
Exit all the extra threads through the base of the head, tie knots and cut
Fix the cheeks with pins between rounds 19 and 22 and sew them on.
Fix the head to the body with pins and start sewing in a circle. When a
small hole remains, add fiberfill between the head and neck, then sew to
the end.
Sew the tail in the middle of the back between rounds 27 and 30
Your bear is ready!
Now let’s start crocheting clothes
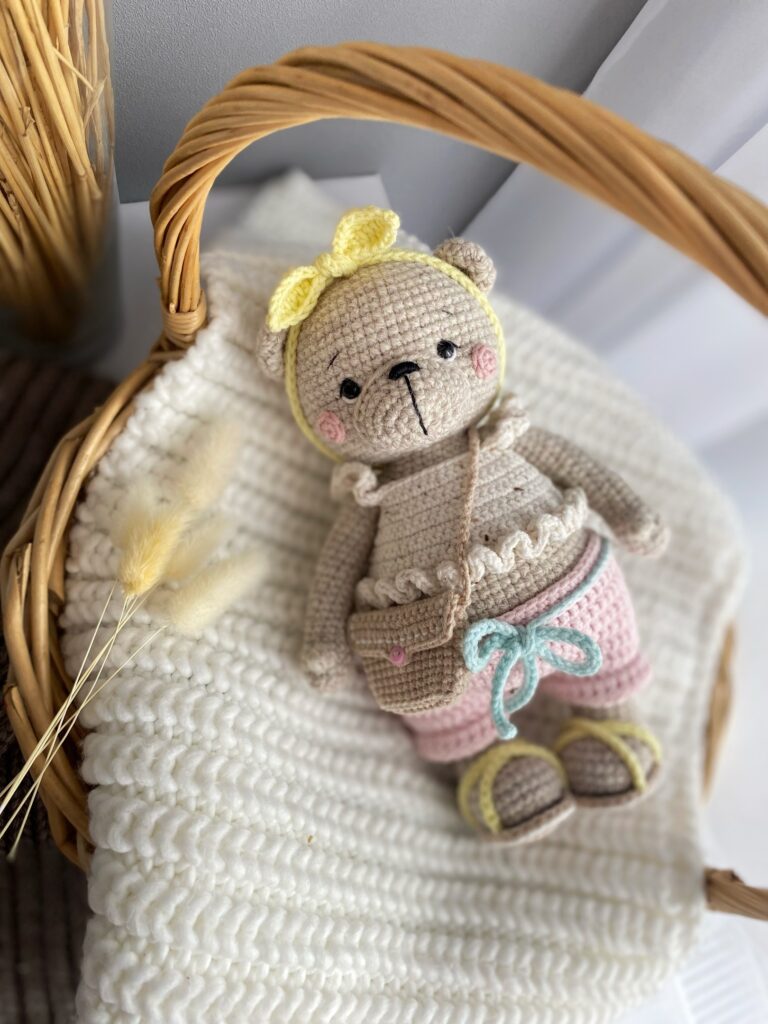
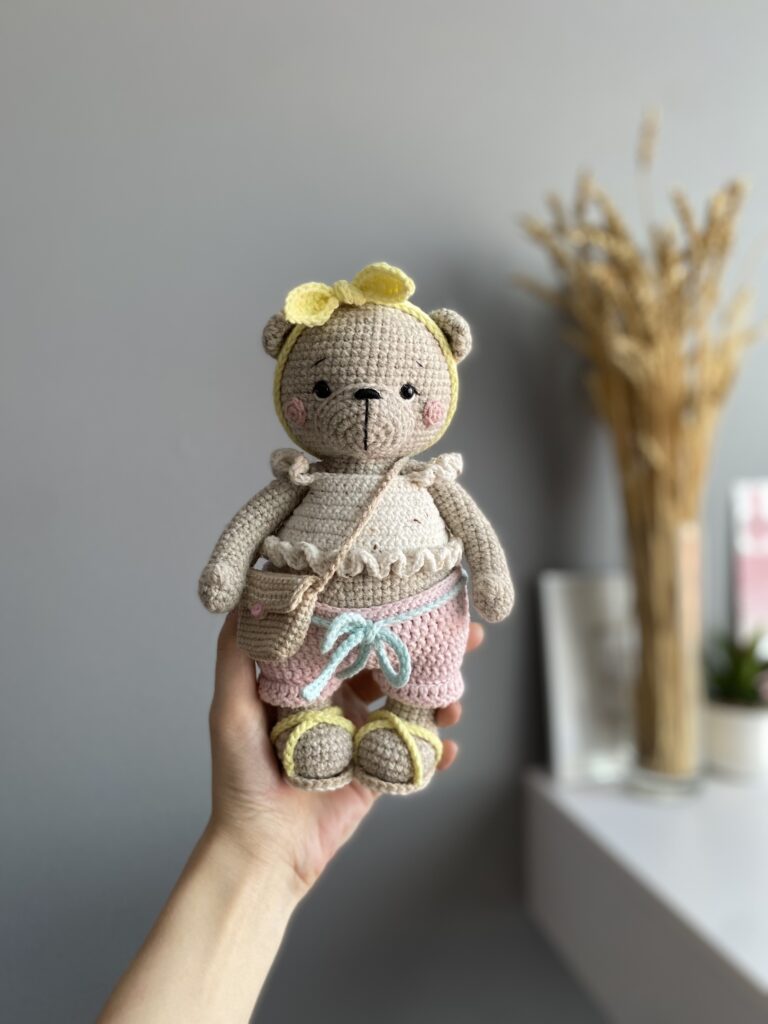
Top for Michelle:
Crochet with light beige color. Work in rows.
Finish each row with 1 turning chain and start a new row from the
second stitch on the hook. Work from the bottom up. After you crochet
the first two rows, try on the workpiece on the bear. If it is small or large,
change the hook size accordingly.
Ch70 + 1 turning chain.
1-2 Rows. 70 sc (2 rows)
3 Row. (dec, 5 sc)10 (60)
4-6 Rows. 60 sc (3 rows)
7 Row. (4 sc, dec)10 (50)
8-9 Rows. 50 sc (2 rows)
In the next row crochet the
straps.
10 Rnd. 8 sc, ch12, skip 9 sc, 16 sc,
ch12, skip 9 sc, 8 sc (56)
11 Rnd. on the main part 8 sc, on
the strap: (dcinc, 3 dc in one
chain)6, on the main part 16 sc, on the strap: (dcinc, 3 dc in one chain)6, 8 sc (92)
Next, crochet around the sides, the hem and form button loops.
-on the first side: 11 sl st, 2 turning chains
-on the hem from the 3rd stitch: (3 dc in one stitch)*70, 2 turning chains (210)
Make button loops in the next row (if you have a different button size,
adjust the size of the button loops yourself).
on the second side: 2 sl st, ch4, skip 1 stitch, 6 sl st, ch4, skip 1 stitch, sl st (17)
Fasten off and cut the yarn, weave in the ends. Sew on buttons.
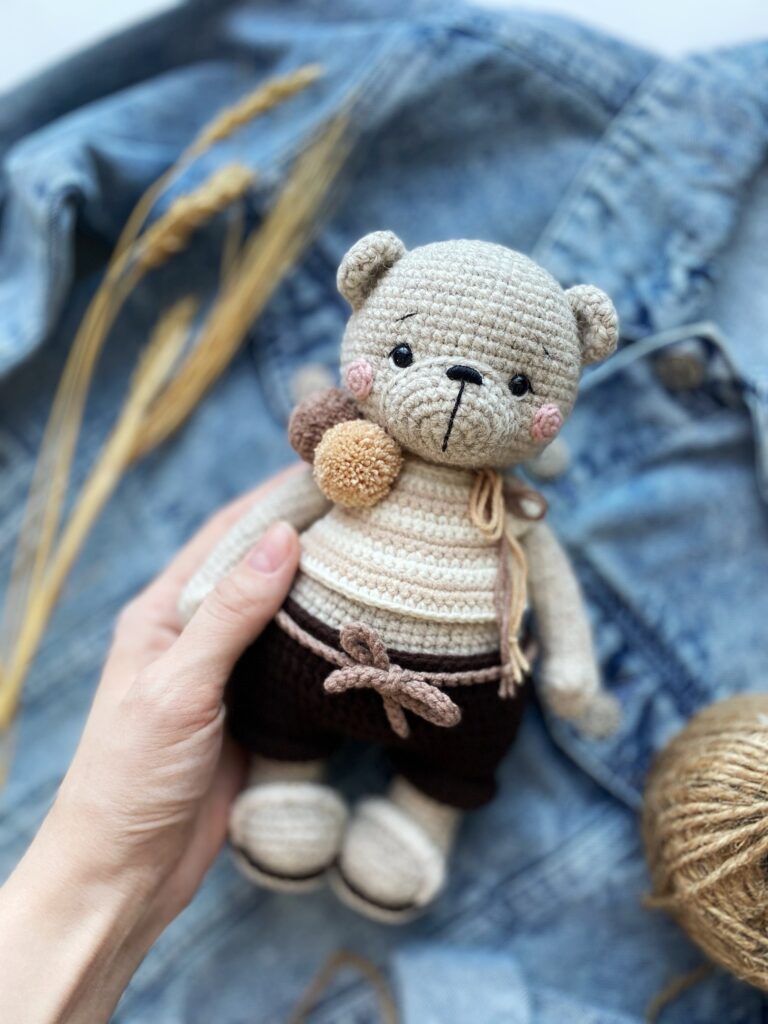
T-shirt for Martin:
For the photo of the process, I used black and white yarn. In the main
photo, Martin is wearing a cream and beige T-shirt. You can use any
option you like. Work in rows. Finish each row with 1 turning chain and
start a new row from the second stitch on the hook. Work from the
bottom up. After you crochet the first 6-7 rows, try on the workpiece on
the bear. If it is small or large, change the hook size accordingly.
Ch36 + 1 turning chain
1 Row. 36 sc
2 Row. (1 sc, inc)18 (54)
Change color when crocheting the last stitch.
3-4 Rows. 54 sc (2 rows), change color
5 Row. 54 sc 6 Row. (8 sc, inc)6 (60), change color
Form sleeves in the next row.
7 Row. 10 sc, ch5, skip 10 sc, 20 sc, ch 5, skip 10 sc, 10 sc (50)
8 Row. 50 sc, change color
9 Row. (4 sc, inc)10 (60)
10 Row. 60 sc, change color
11 Row. (inc, 5 sc)10 (70)
12 Row. 70 sc, change color
13 Row. 70 sc
Next, crochet around the sides and form button loops (if you have a
different button size, adjust the size of the button loops yourself).
on the first side: 3 sc, ch4, skip 1 stitch, 6 sc, ch4, skip 1 stitch, 2 dc (19)
on the neckline: 36 sl st (36)
on the second side: 13 sc (13)
Fasten off and cut the yarn, weave in the ends. Sew on buttons.
Shorts:
Crochet with pink yarn. Work in rounds. Finish each round with sl st and
start with ch2. Work from the bottom up.
Ch25, connect in a circle with sl st, ch2
1st pant leg.
1-2 Rnds. 25 sc (2 rounds)
Fasten off and cut the yarn, weave
in the ends.
Crochet the 2nd pant leg in the
same way, do not cut the yarn.
From the second leg, ch2 and
attach to the first leg with sl st,
place a marker (there will be the
beginning of the round), ch2.
3 Rnd. 25 sc on the first leg, 1 dc
into ch in the previous round (to
prevent gaps), 2 dcinc on the chain,
25 dc on the second leg, 1 dc into
ch in the previous round, 2 dcinc
on the chain (60)
4-7 Rnds. 60 dc (4 rounds)
Leave a hole for the tail in the next round.
8 Rnd. 57 dc, ch3, skip 3 stitches, sl st, ch1 (60)
9 Rnd. 60 dc
10 Rnd. 60 sc in back loops
11 Rnd. 60 sc
Fasten off and cut the yarn, weave in the ends.
Ties for shorts.
Attach the mint yarn to round 9 and work in front loops. Make sure that
the ties are located in front of the shorts, in the middle. You may need
to adjust their location yourself.
1 Row. 32 sl st, ch30, from the second chain on the hook: 29 sl st, sl st
into the same loop on the shorts, 2 sl st, ch30, from the second chain on
the hook: 29 sl st, sl st into the same loop on the shorts, 26 sl st
Fasten off and cut the yarn, weave in the ends.
Shorts for Martin are crocheted in the same way. If desired, the ties can
be made a little shorter.
Sandals for Michelle (make 2):
Sole.
Crochet with beige yarn. Work in rounds. Finish each round with sl st
and start with ch1.
1 Rnd. ch6, start in the second chain from the hook: hdcinc, 3 hdc,
4 hdc in the last chain, on the other side of the chain: 3 hdc, hdcinc (14)
2 Rnd. 2 hdcinc, 3 hdc, 4 hdcinc, 3 hdc, 2 hdcinc (22)
3 Rnd. (hdc, hdcinc)2, 3 hdc, (hdc, hdcinc)4, 3 hdc, (hdc, hdcinc)*2 (30)
Change color to light beige when crocheting the last stitch. Fasten off
and cut the beige yarn, weave in the ends. Next, work around with sl st.
4 Rnd. 30 sl st
Fasten off and cut the yarn, weave in the ends.
Sandal straps. Crochet with yellow
yarn.
On the wrong side of the sole, mark
points 1, 2, 3, 4 as shown in the
photo. The distance between points
1 and 2 is 4 stitches, between points
1 and 3 – 10 stitches, between points
3 and 4 – 4 stitches, between points
2 and 4 – 8 stitches.
Attach the thread to point 2 in both loops, as shown in the photo.
Ch18, then attach the chain to point 3, also in both loops, as in the photo.
Work 18 sl st on the chain, returning to point 2.
Fasten off and cut the yarn, weave in the ends.
Crochet the second strap in the same way, but you need to attach the
yarn first to point 4, then to point 1 and back to point 4
Slippers for Martin (make 2):
Slippers are crocheted in the same way as sandals for Michelle, except
for the straps.
Crochet the sole with dark
brown yarn and crochet around
with beige yarn with sl st.
Top part. Crochet with light beige
yarn. Ch18 + 1 turning chain. Leave
the yarn end about 15 cm long at the
beginning. Work in rows, finish each
row with – 1 turning chain and start a
new row from the second stitch on
the hook.
1-2 Rows. 18 sc (2 rows)
Fasten off and cut the yarn, leaving a
long end for sewing.
Fix the upper part of the slippers to the sole with pins, as shown in the
photo, and sew. Fix the threads and weave in the ends.
Bag for Michelle:
Crochet with beige yarn.
Ch10.
1 Rnd. Start in the second chain from the hook: inc, 7 sc, 4 sc in the last
chain, on the other side of the chain: 7 sc, inc (22)
2 Rnd. 2 inc, 7 sc, 4 inc, 7 sc, 2 inc (30)
3 Rnd. 30 sc in back loops
4-11 Rnds. 30 sc (8 rounds)
Next, crochet the flap on only one
side of the bag in rows, finish each
row with – 1 turning chain and start
a new row from the second stitch
on the hook.
12-16 Rows. 14 sc (5 rows)
In the next row, make a button loop (if you have a different button size,
adjust the size of the button loops yourself).
17 Row. 7 sc, ch3, 7 sc (17)
Without cutting the yarn, work on one side of the flap 6 sl st, then sl st in
the first stitch of round 11 of the bag.
Without cutting the yarn, make the handle of the bag. Ch55, then sl st in
the stitch 16 in round 11 of the bag.
And then work on the other side of the flap 6 sl st. Fasten off and cut the
yarn, weave in the ends.
Using a needle with a light beige thread, make a decorative seam as in
the photo. Fasten off and cut the yarn, weave in the ends. Sew on a
button.
Soloha headband for Michelle:
Crochet with yellow yarn.
Ch90 + 1 turning chain.
1 Rnd. start in the second chain from the hook: sl st, sc, hdc, dc, 2 tr, dc,
hdc, sc, 72 sl st, sc, hdc, dc, 2 tr, dc, hdc, sc, sl st (90)
2 Rnd. on the other side of the foundation chain: sl st, sc, hdc, dc, 2 tr, dc,
hdc, sc, 72 sl st, sc, hdc, dc, 2 tr, dc, hdc, sc, sl st (90)
Fasten off and cut the yarn, weave in the ends.
Pompoms for Martin (make 2):
The diameter of the pompom should be about 2 cm. If you have a
special device for making pompoms, use it. I used the easiest way.
Take beige yarn.
-Holding the tip of the thread, wrap the yarn around 2 fingers until the
workpiece is quite thick. Cut the thread.
-Remove the workpiece from the fingers. Cut the thread about 40 cm
(this will be a tie around the neck) and tie the workpiece tightly in the
middle.
-Cut the threads on all sides along the fold.
-Trim the pompom with scissors, giving it a rounded shape.
Similarly, make the second brown pompom and tie them together.
You have done all the clothes for the bears Michelle and Martin!
Now you can dress them up!
More Amigurumi Bear İdeas