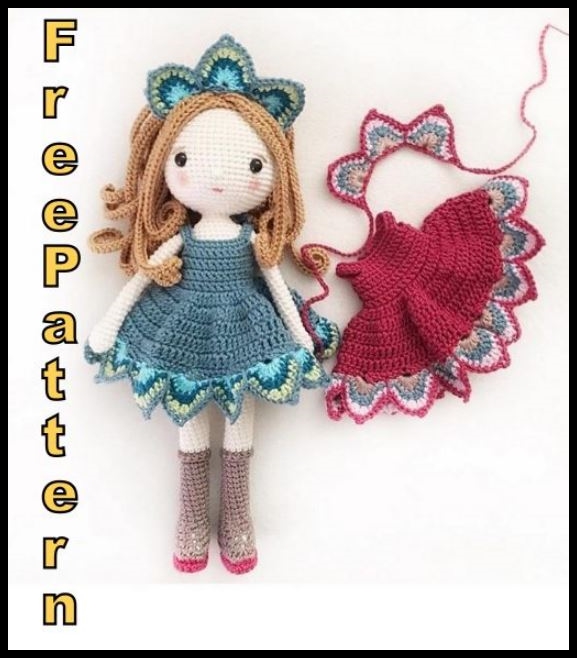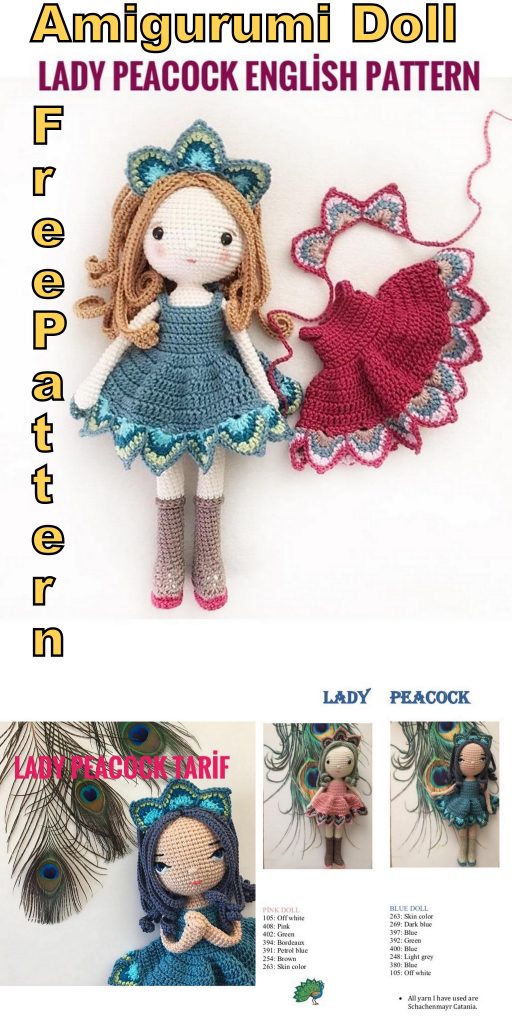
Lady Peacock Crochet Doll Free Amigurumi Pattern
Hello dear visitors, I am here again with new amigurumi molds for you. I am sharing amigurumi patterns for you here for free. You can make your children happy by making these patterns. Amigurumi toys are very popular lately and are the most beautiful toys that don’t harm your kids. Your kids will love them. Let’s move on to our pattern and give them this gift.
PİNK DOLL
105: Off white
408: Pink
402: Green
394: Bordeaux
391: Petrol blue
254: Brown
263: Skin color
BLUE DOLL
263: Skin color
269: Dark blue
397: Blue
392: Green
400: Blue
248: Light grey
380: Blue
105: Off white
Supplies:
- Yam in colors of your choice
- 2.5 mm crochet hook
- 8 mm (colored) safety eyes
- Fiberfill
- Stitch marker
- Embroidery needle for sewıng
- 2 small buttons
- İ have used petrol blue safety eyes. you may use black ones either.
- Do not close the rows while crocheting. Work in continuous rouns.
- You may use a piece of different color yam as stitch marker. place this in the first stitch of row and don’t forget to move it upper as you crochet.
| Additional inforıııations and abbreviations: ch : chain sc : singlc crochet dc : doublc crochet hdc : halfdouble crochet inc : incrcase dec : decrease blo : back loop only flo : front loop only rnd : round st(s) : stitch(es) sc3tog: crochet 3 stitehes together |

Hands and Arms:
Tour: —————– Number of stitches
1: magic ring into 5sc 5
2: 5 inc 10
3-4-5: (3 rnds) 10 sc 10
6: dec, 3 sc, dec, 3 sc 8
7-26: (20 rnds) 8 sc 8
Slst to next st and cut yarn. Make 2 and don’t fiil arms.
Boots:
Bottom of the boot is made from the color of the dress.
Round —————— Stitch count
1)Ch 10, starting from 2’d st 1 inc,7 sc , 3sc in next st, 8 sc (20)
2) 2inc,7 sc,3 inc,8 sc (25)
3) Flo 25 sc (25)
4) Change to boots color blo 11 sc,
dec, 2 sc, dec, 8 sc (23)
5) 10 sc, 3 dec, 7 sc (20)
6) 8 sc, 3 dec, 6 sc (17)
7) 7 sc, dec, sc, dec, 5sc (15)
8) 6 sc, dec, sc, dec, 4sc (13)
9) 7 sc, dec, 4sc (12)
10-22) (13 rnds) 12 sc (12)
23) flo 12 hdc (12)
Slst and cut yarn. change to skin color.
Leg:
Connect skin color yarn and crochet 20 rounds of sc in each st around (12 sc per round). finish fırst leg with cutting yarn.
Crochet one more leg and change to underwear color when finishing it. Crochet few more sts or rip few sts to get right to the back point of leg for the color change. Crochet one round (finish in a side point) and connect 2 legs together with ch 4. This w as the first round of body.
Body
Round —————— Stitch count
2) 12 sc, in the 4 ch sts: 4sc,
12 sc, in the 4 ch sts: 4 sc (32)
3-9) (7 mds) sc in ali sts around (32)
10) one round of sc with skin color (32)
11) Make sc3tog at both sides of the body and crochet 13 sc between them (28)
12) 12 sc.dec,12 sc. dec (26)
13-19) (7 mds) sc in each st around (26)
20) with undervvear color sc in each st around (26)
21-22) (2 mds) sc in each st around (26)
23) with skin color sc in each st around (26)
24) Now attach arms exactly to the sides. crochet together 3 sts of arm with 3 sts of body. 10 sc. do same with second arm 3 sc arm and body sts together. 10 sc (26)
25) dec,sc,dec,10 sc,dec,sc,dec,10 sc (26)
26) 2 dec,9 sc, 2 dec,9sc (22)
27) 3 dec,5 sc ,3 dec , 5 sc (16)
28) 2 dec,4 sc,2 dec,4 sc (12)
29-31) ( 2 rnds) 12 sc (12)
Now we’re gonna go head-to-head, so
starting point coincides with the back of the baby
If you are currently in the back
knitting or unscrewing several loops
Come back to the middle section.
fill it tightly. Continue after the head body
will be knitted as a whole
HEAD
Round —————— Stitch count
1) 12 inc (24)
2) ( 1 sc,1 inc)*12 (36)
3) ( 5 sc 1 inc)*6 (42)
4) (6 sc 1 inc)*6 (48)
5) (7 sc 1 inc)*6 (54)
6-19) (14 rnds) (54)
After crocheting 14 rounds of sc count 7 rounds from the hook down and place the 8 mm safety eyes between row 7 and 8 leaving 11 sts space hetween them.
20) (7 sc .1 dec)*6 (48)
21) (6 sc .1 dec)*6 (42)
22) (5 sc .1 dec)*6 (36)
23) (4 sc .1 dec)*6 (30)
24) (3 sc .1 dec)*6 (24)
25) (2 sc .1 dec)*6 (18)
Fiil the neek and the head firmly. you might make the head even more stand-streight with placing a piece of plastic stick or a wire in the neek.
26) (1 sc .1 dec)* 6 (12)
27) ( 6 dec) (6 )
After filling the head slst to next st and cut yarn with Ieaving enough long yarntail for embroidering the nose 2 rounds under the eyes. Pull the last 6 sts together with a help of an embroidery needle. Fasten off.
HAİR
Firstly crochet the base of the hair
Round —————— Stitch count
1) Magic ring into 6sc (6)
2) 6 inc (12)
3) (1 sc, 1 inc) * 6 (18)
4) (2 sc 1 inc) * 6 (24)
5) (3 sc 1 inc) * 6 (30)
6) (4 sc 1 inc) * 6 (36)
7) (5 sc 1 inc) * 6 (42)
8) (6 sc 1 inc) * 6 (48)
9) (7 sc 1 inc) * 6 (54)
10-16) (7 rnds) 54 sc (54)
Cut yarn Ieaving long yarntail and sew hair base onto the head like shown at picturc (next page).
Mark the edge of the hair base on the head with a needle 4 rows downer from the finishing point of the head.
Crochet the curls into a magic ring.
Make alltogether 20 curls like:
1 piece 52 ch with 50 hdc
1 piece 57 ch with 55 hdc
16 piece 62 ch with 60 hdc
1 piece 57 ch with 55 hdc I piece 52 ch with 50 hdc
After crocheting all curls close the magic ring, fasten off, cut yam with leaving long yarntail forsewing and embroidering the eyebtows. Sew the curls up onto the top of the head, on the base you have crocheted. Fix it only by the middle of the piece. Embroider the eyebrows than fasten off the yam and hide the yarntail it into the head.
Dress:
• 40ch(turn!)
• Start from 211 ch: 38 sc, ch 6, slst lo the last sc you made so you have created a buttonhole loop.(turn!) • 6 sc,5 ch, skip 7 sts, (from the 8 st make:) 12 sc. 5 ch, skip 7 sts, (from the 8’h st make:) 6 sc (turn!)
• 6 sc. in the underarm chain sts make:
4 sc . 12 sc,4 sc,6 sc (32 sc)(turn!)
• crochet 5 more rows of sc in each st. (32 sc) When fınished make ch 6 and slst to the last sc you have crocheted to create a buttonhole.(turn!)
• 32sc(Turn!)
• 2 ch . make 2 dc in each st around. don’t turn. close the round with slst into the top of first ch2 sts (64) Start
every round with ch 2 and close the rounds wtth slst to here. work in rounds from this point. not in rows.
• (dc in next st. 2 dc in next st) 32 times(96)
• make 3 rounds of 96 dc
• repeat: (sc in each of next 6 sts. ch4. slst to the same st) until end of round created in last roulnd. Repeat until end of round.
• Change to light green, sc in each of next 2 sts. 1 hdc. 2dc into the next st. 2dc into the next st also. 1 hdc. sc in each of next 2 sts. and crochet 3sc on the ch5 sts you
• Change to petrol blue color and sc in each of next 4 sts. 2dc into the next st. 2dc into the next st again. sc in each of next4 sts. and crochet 1 sc into the middle st of 3 sc-s you crocheted in the last round. Repeat until end of round.
• Change to pink color and sc in each of next 6 sts. ch3 and sc to the same st. sc in each of next 6 sts . at the middle sections make a sc into the last pink row of the dress you have made earlier.
you made into the first loop. ch5 again. Repeat until end of round.
Pattern is useing the colors of the dress in the pictures above.
Change to bordeaux color. İnto the ch4 loops make: 1 sc2 hdc.2 dc. 2hdc. 1 sc. than ch5 and repeat the sts
Tiara-Headband
Make ch55 with pink color yarn skip 4 sts and sc in 5 st from hook. ch10. skip 4 sts
and sc in 5th st from hook. ch10 again and skip 4 sts and sc in 5th st from hook. ch50. Pink section is done.
Tie the headband on the head by making a bow at the back side of the head. Place the headband behind of the 4 short curls
After the pink row is done, crochet the next 4 rows as you did in the dress section.
First time I have tried to make embroidered eyes, you may also try it with the help of the pictures above. 1 have usedCatania yarn for the eyes also. Make the head the same way without puting the safety eyes for this version. Firstly I have stitched the black, than the petrol and finally the white places.
