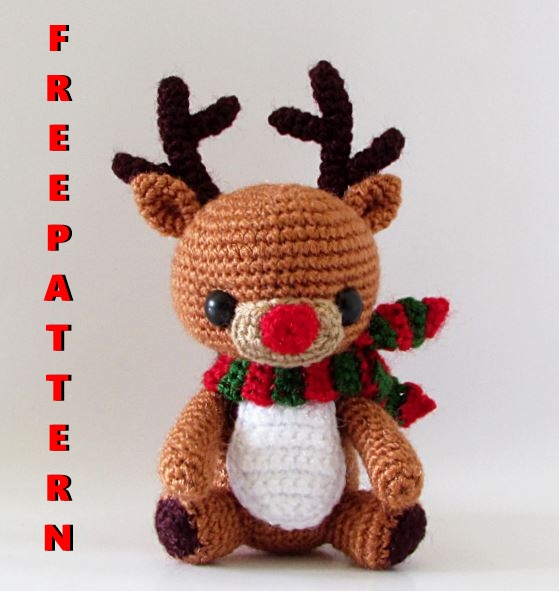
Rudy The Reindeer Amigurumi Free Pattern
Hello dear visitors, I am here again with new amigurumi molds for you. I am sharing amigurumi patterns for you here for free. You can make your children happy by making these patterns. Amigurumi toys are very popular lately and are the most beautiful toys that don’t harm your kids. Your kids will love them. Let’s move on to our pattern and give them this gift.
Desinger : https://talesoftwistedfibers.wordpress.com/
This is an original pattern by Tales of Twisted Fibers
Materials
• sock weight yarn in chestnut brown, dark
brown, white, light brown, red, green
• 2.5 mm crochet hook
• 10 mm sew on eyes
• fiberfill for stuffing
• yarn needle
Finished size: 4.5 inch till the tip of ears
Skill level: Easy
Terminology (US)
chain (ch)
magic ring
single crochet (sc)
increase (inc)
decrease (dec)
back loop only (BLO)
slip stitch (sl st)
BODY
Round 1: 8 sc in a magic ring with chestnut brown. (8)
Round 2: inc X 8. (16)
Round 3: (sc 1, inc) X 8. (24)
Round 4: (sc 2, inc) X 8. (32)
Round 5: (sc 3, inc) X 8. (40)
Round 6-11: sc around. (40)
Round 12: (sc 3, dec) X 8. (32)
Round 13-15: sc around. (32)
Round 16: (sc 2, dec) X 8. (24)
Round 17-19: sc around. (24)
Round 20: (sc 1, dec) X 8. (16)
Round 21: sc around. (16)
Fasten off. Weave in yarn end. Stuff.
WHITE BODY PATCH
Row 1: ch 5 with white. Starting from second ch from
the hook, sc 4, turn. (4)
Row 2: ch 1, inc in the first st, sc 2, inc in the last st,
turn. (6)
Row 3: ch 1, sc across, turn. (6)
Row 4: ch 1, inc, sc 4, inc, turn. (8)
Row 5-6: ch 1, sc across, turn. (8)
Row 7: ch 1, dec, sc 4, dec, turn. (6)
Row 8-11: ch 1, sc across, turn. (6)
Row 12: ch 1, sc across, ch 1.
Turn work clockwise and sc along the row end on the
left. Continue working sc on the foundation chain and
finally along the row end on the right. Fasten off, leaving a long tail. Thread a yarn needle with this tail and
sew patch on the body. The top of the patch should
align with Round 20 of the body.
LEG (make 2)
Round 1: With dark brown, 6 sc in a magic ring. (6)
Round 2: inc X 6. (12) Fasten off this color.
Round 3: Join chestnut brown and working in BLO, (sc
1, inc) X 6. (18)
Round 4-5: sc around. (18)
Round 6: dec X 6, sc 6. (12)
Round 7-8: sc around. (12)
Fasten off, leaving a tail to sew. Pin legs on either
side of the white patch between Round 5 and 9 and
sew in place.
TAIL
Round 1: With chestnut brown, 3 sc in a magic ring.
(3)
Round 2: inc X 3. (6)
Round 3-4: sc around. (6)
Fasten off and sew in place on Round 6 of the body.
ARM (make 2)
Round 1: With chestnut brown, 6 sc in a magic ring. (6)
Round 2: inc X 6. (12)
Round 3-4: sc around. (12)
Round 5: dec X 2, sc 8. (10)
Round 6-14: sc around. (10)
Fasten off, leaving a tail to sew. Stuff lightly and sew
on either side of the body.
HEAD
Round 1: With chestnut brown, 8 sc in a magic ring. (8)
Round 2: inc X 8. (16)
Round 3: (sc 1, inc) X 8. (24)
Round 4: (sc 2, inc) X 8. (32)
Round 5: (sc 3, inc) X 8. (40)
Round 6: (sc 4, inc) X 8. (48)
Round 7-15: sc around. (48)
Round 16: (sc 4, dec) X 8. (40)
Round 17: (sc 3, dec) X 8. (32)
Round 18: (sc 2, dec) X 8. (24)
Round 19: (sc 1, dec) X 8. (16)
Fasten off, leaving a long tail to sew head to body.
MUZZLE
Round 1: With light brown, ch 6. Starting from second
chain from the hook, 2 sc in the first ch, sc 3, 4 sc in
the last chain. Working on the opposite side of the
foundation chain, sc 3, 2 sc in the last chain. sl st in the
first st of the round. (14)
Round 2: ch 1, 2 sc in the first st, sc 5, 2 sc in the next
2 st, sc 5, 2 sc in the last st. sl st in the first st of the
round. (18)
Fasten off, leaving a long tail to sew.
NOSE
With red, 8 sc in a magic ring, sl st in the first st of the
round. Fasten off and sew nose on the muzzle.
Next, sew muzzle on the head between Round 11
and 17.
EYE
Attach eyes on either side of the muzzle.
EAR (make 2)
Round 1: With chestnut brown, 3 sc in a magic ring.
(3)
Round 2: inc X 3. (6)
Round 3: (sc 1, inc) X 3. (9)
Round 4: (sc 2, inc) X 3. (12)
Round 5-6: sc around. (12)
Fasten off, leaving a long tail to sew. Press the ear flat
with your fingers. Push the two corners at the base
towards each other and, using a yarn needle, fix in this
position with a few stitches. Attach to head between
Round 6 and 8.
ANTLER (make 2)
First piece
Round 1: With dark brown, 5 sc in a magic ring. (5)
Round 2-12: sc around. (5)
Fasten off, leaving a tail to sew.
Second piece
Round 1: 4 sc in a magic ring. (4)
Round 2-5: sc around. (4)
Fasten off, leaving a tail to sew.
Third piece
Round 1: 4 sc in a magic ring. (4)
Round 2-4: sc around. (4)
Fasten off, leaving a tail to sew.
Sew the second piece on the first piece on the third round
from the base. Sew the third piece on the seventh round.
Attach on the head behind the ears.
SCARF
Row 1: With red, ch 4. Starting from second ch from the
hook, sc 3, turn. (3)
Row 2: ch 1, sc 3, turn. (3)
Row 3: Join green. ch 1, sc 3, turn. (3)
Row 4: ch 1, sc 3, turn. (3)
Row 5: With red, ch 1, sc 3, turn. (3)
Row 6: ch 1, sc 3, turn. (3)
Repeat Row 3-6 until there are a total of 27 red and green
stripes. Fasten off and weave in ends.
Attach head to the body. Tie scarf around the neck.
