Amigurumi Cute Doll Free English Pattern
Hello dear visitors, I am here again with new amigurumi molds for you. I am sharing amigurumi patterns for you here for free. You can make your children happy by making these patterns. Amigurumi toys are very popular lately and are the most beautiful toys that don’t harm your kids. Your kids will love them. Let’s move on to our pattern and give them this gift.
Pattern: Mikhetova Svetlana (Svetilinik_s)
Materials for the manufacture of:
- Hook number 1.5
- Threads for my body, I have Semenovskaya Carolina, the color “Heather” 100gr / 438m
- Finished hair or any thread to your taste, I have a sock additive White
- Eye fitting (white)
- Fabricated eyelashes, pupils
- Wire
- Filling
- Thread for embroidery lips (light pink) or finished lips, and brown thread for eyebrows
- Glue moment “Crystal”
- Threads for clothes
- Long needle for tightening
- When using these threads, the doll’s height is 25cm.
Designations:
Sc – single crochet
Ch – air loop
İnc – knit 2 stitches from one loop
Dec – 2 stitches knit together
3rd inc – knit 3 stitches from one loop
3rd dec – 3 loops together
Psc – half crochet
dc – single crochet
Attention:
We follow the position of the marker, in case of its deviation we make displacement loops, they are not indicated in the description.
Hands (2 pcs):
Fingers: Medium
finger (2 children):
1 row: 5sc into magic ring
2 row-6 row: 5sc (5 rows), fasten the thread, cut
Index and nameless (4 children)
1 row: 5sc into magic ring
2 row-5 row: 5sc (4 rows), fasten the thread, cut
Big and pinky (4 children)
1 row: 5sc into magic ring
2 row-4 row: 5sc (3 rows), fasten and cut the thread on the thumb, on
leave the little finger
Start connecting fingers
Right hand
1 row: 2 sc on the little finger, 2 sc on the nameless, 2 sc on the middle, 5 sc on the index, 3 sc on the middle, 3 sc on the nameless, 3 sc on the little finger = 20 sc
2 row-3 row: 20 sc
4 row: 6 sc, 2 sc together with the thumb. 12 sc = 20 sc
5 row: 5 sc, dec (sc palm + sc thumb), 2 sc on the thumb, 12 sc = 20 sc
6 row-7 row: 20 sc
8 row: (3 sc, dec) * 4 times = 16 sc
9 row: (2 sc, dec) * 4 times = 12 sc
10 row: 6 ps, 6 sc = 12 sc
We put a wire about 14 cm long, we stuff a palm
11 row: (2 sc, inc) * 4 times = 16 sc
12-15 row: 16 sc (4 rows)
16 row: (7 sc, inc) * 2 times = 18 sc, increments should be located on the sides
hands
17-20 row: 18 sc (4 rows)
21 row: (7 sc, dec) * 2 times = 16 sc
22 row: 16 sc
23 row: 10 sc, 6 inc (elbow) = 22 sc
24 row: 22 sc
25 row: 2 sc, 7 ps, 13 sc = 22 sc
26 row: 10 sc, 6 dec = 16 sc
27 row: (3 sc, inc) * 4 times = 20 sc
28-29 row: 20 sc
30 row: (9 sc, inc) * 2 times = 22 sc
31-39 row: 22 sc (9 rows)
40 row: 5 sc, ch, bend the wire, 1 sc skip, 16 sc = 22 sc
41 row: (9 sc, dec) * 2 times = 20 sc
42 row: (2 sc, dec) * 5 times = 15 sc
43 row: (1 sc, dec) * 5 times = 10 sc
44 row: 5 dec, pull off the remaining hole, leave the thread for sewing

Left hand:
1 row: 3 sc on the little finger 3 sc on the nameless, 3 sc on the middle, 5 sc on the index, 2 sc on the middle, 2 sc on the nameless, 2 sc on the little finger = 20 sc
2-3 row: 20 sc
4th row: 12 sc, 2 sc with thumb, 6 sc = 20 sc
5 row: 12 sc, 2 sc on the thumb, dec (sc of thumb + sc of palms), 5 sc = 20 sc
6-7 row: 20 sc
8 row: (3 sc, dec) * 4 times = 16 sc
9 row: (2 sc, dec) * 4 times = 12 sc
10 row: 6 sc, 6 psc = 12 sc
We put the wire
11 row: (2 sc, inc) * 4 times = 16 sc
12-15 row: 16 sc (4 rows)
16 row: (7 sc, inc) * 2 times = 18 sc
17-20 row: 18 sc (4 rows)
21 row: (7 sc, dec) * 2 times = 16 sc
22 row: 16 sc
23 row: 6 inc, 10 sc = 22 sc
24 row: 22 sc
25 row: 13 sc, 7 ps, 2 sc = 22 sc
26 row: 6 dec, 10 sc = 16 sc
27 row: (3 sc, inc) * 4 times = 20 sc
28-29 row: 20 sc
30 row: (9 sc, inc) * 2 times = 22 sc
31-39 sc: 22 sc (9 rows)
40 row: 16 sc, ch, bend the wire, 1 sc skip, 5 sc = 22 sc
41 row: (9 sc, dec) * 2 times = 20 sc
42 row: (2 sc, dec) * 5 times = 15 sc
43 row: (1 sc, dec) * 5 times = 10 sc
44 row: 5 dec, tighten the hole, fasten the thread and cut
Legs: (2pcs)
Fingers:
thumb (2pcs.)
1 row: 5sc into magic ring
2-3 row: 5sc, fasten the thread, cut the fingers (6 pcs.)
1 row: 5sc into magic ring
2 row: 5sc 3 row: 3sc, fasten thread, trim pinky (2pcs.)
1 row: 4sc into magic ring
2 row: 4sc
3 row: 2sc, do not break the thread.
Start connecting fingers
1 row: 3sc on the first finger, 3sc on the second, 3sc on the third, 5sc on the thumb, 2sc on the third finger, 2sc on the second, 2sc on the first, 2sc on the little finger = 24sc (put the marker)
2 row: 24sc
3 row: 11sc, dec, 11sc = 23sc
4 row: 12sc, dec, 9sc = 22sc
5-8 row: 22sc (4 rows)
9 row: 1sc, 3rd decrease, 18sc-20sc
Right leg
10 row: we knit with rotary rows 12sc, ch, rotate Dec, 8sc, dec, ch, rotate 3Dec, 6sc, dec, ch, rotate 8sc, ch, rotate (2 times) Dec, 4sc, dec, ch, rotate 6sc, then round
11th row: dial 6sc, 8sc on the first side, dial 6sc on the second side, 6sc = 26sc
12 row: 4sc, dec, 8sc, dec, 10sc = 24sc (we knit the stitches of this row for the front wall of the loop)
13 row: 3sc, dec, 8sc, dec, 9sc = 22sc
14 row: 2sc, dec, 8sc, dec, 2sc, dec, 2 sc, dec = 18sc
15 row: 14 sc, 2dec = 16sc
16 row: 16sc
If your doll is on the frame, at this stage we put the wire, I have
its length is about 30 cm (it runs all over the body and fits into the head). We fill the foot so that it remains flat and the heel is round, then stuffing along the knitting. 2 increments in the 17th row should get in the middle in the back, do 2-3 offset loops, put a new marker.
17 row: 11sc, 2 inc, 3sc = 18sc
18 row: 18sc
19 row: 11sc, 3rd inc, 2sc, 3rd inc, 3sc = 22sc
20-26 row: 22sc = 7 rows
27 row: 11sc, inc, 6sc, inc, 3sc = 24sc
28-31 row: 24sc = 4 rows
32 row: 12sc, 3rd dec, 4sc, 3rd dec, 2sc = 20sc
33 row: 20sc
34 row: 1sc, dec, 4sc, dec, 11sc = 18sc
35 row: 6inc (knee), 4sc, dec, 2sc, dec, 2sc = 22sc
36 row: 15sc, 5пsc, 2sc = 22sc
37 row: 22sc
38 row: 6dec, 5sc, 2inc, 3sc = 18sc
39 row: 1sc, inc, 3sc, inc, 12sc = 20sc
40 row: (4sc, inc) * 4 times = 24sc
41-42 row: 24sc
43 row: (5sc, inc) * 4 times = 28sc
44-54 row: 28sc
55 row: 20sc, 7inc (for priests), 1sc = 35sc, fasten the thread, cut it.
Left leg
10 row: 1sc, ch, then rotary rows 12sc, ch, turn Dec, 8sc, dec, ch, turn Dec, 6sc, dec, ch, turn 8sc, ch, turn (2 times) Dec, 4sc, dec, then follow circle
11 row: dial 6sc, 8sc, dial 6sc on the second side, 6sc
12-54 row: like the right leg
55 row: 15sc, 7inc, 6sc = 35sc, do not break the thread
Torso:
Connect the legs: knit 14sc, 3ch on the left leg, connect with the right leg, continue knitting in front.
1 row: 20sc, (1sc, inc) * 7 times, 1sc, 3sc by ch, 1sc, (inc, 1sc) * 7 times, 20sc, 3sc by ch = 90sc, put a marker.
2 row: 90sc
Further to the 10th row, all 3rd decreases should be located in the middle of the back.
3 row: 2sc, inc, 40sc, 3rd dec, 40sc, inc, 3sc = 90sc
4 row: 3sc, inc, 81sc, inc, 4sc = 92sc
5 row: 4sc, inc, 39sc, 3rd dec, 39sc, inc, 5sc = 92sc
6 row: 5sc, inc, 79sc, inc, 6sc = 94sc
7 row: 25sc, dec, 18sc, 3rd dec, 18sc, dec, 26sc = 90sc
8 row: 26sc, dec, 33sc, dec, 27sc = 88sc
9 row: 12sc, dec, 12sc, dec, 14sc, 3rd dec, 14sc, dec, 12sc, dec, 13sc = 82sc
10 row: 39sc, 3rd dec, 40sc = 80sc
11 row: 11sc, dec, 13sc, dec, 8sc, 3rd dec, 1sc, 3rd dec, 8sc, dec, 13sc, dec, 12sc = 72sc
12 row: 10sc, dec, 14sc, dec, 4sc, dec, 3sc, dec, 4sc, dec, 14sc, dec, 11sc = 66sc
13 row: 9sc, dec, 15sc, dec, 1sc, dec, 3sc, dec, 1sc, dec, 15sc, dec, 10sc = 60sc
14 row: 8sc, dec, 39sc, dec, 9sc = 58sc
15 row: 7sc, dec, 39sc, dec, 8sc = 56sc
16 row: 7sc, dec, 37sc, dec, 8sc = 54sc
17 row: 7sc, dec, 35sc, dec, 8sc = 52sc
18 row: 7sc, dec, 33sc, dec, 8sc = 50sc
19-29 row: 50sc (11 rows)
30 row: (8sc, dec) * 5 times = 45sc
31 row: 45sc
32 row: (7sc, dec) * 5 times = 40sc
33-39 row: 40sc (7 rows)
40 row: 8sc, 2dec (shoulder), 16sc, 2dec (shoulder), 8sc = 36sc
41 row: (4sc, dec) * 6 times = 30sc
42 row: (3sc, dec) * 6 times = 24sc
43 row: (2sc, dec) * 6 times = 18sc
44-47 row: 18sc (4 rows), leave the thread for sewing about 30cm

Head:
1 row: 6 sc into magic ring
2 row: 6 inc = 12 sc
3 row: (1 sc, inc) * 6 times = 18 sc
4th row: (2 sc, inc) * 6 times = 24 sc
5 row: (3 sc, inc) * 6 times = 30 sc
6 row: (4 sc, inc) * 6 times = 36 sc
7 row: (5 sc, inc) * 6 times = 42 sc
8 row: 42 sc
9 row: (6 sc, inc) * 6 times = 48 sc
10 row: 48 sc
11 row: (7 sc, inc) * 6 times = 54 sc
12 row: 54 sc
13 row: (8sc, inc) * 6 times = 60 sc
14-21 row: 60 sc (8 rows)
22 row: 22 sc, (1 sc, inc) * 3 times, 4 sc, (inc, 1 sc) * 3 times, 22 sc = 66 sc
23 row: 66 sc
24 row: 22 sc, (2 sc, inc) * 3 times, 4 sc, (inc, 2 sc) * 3 times, 22 sc = 72 sc
25-34 row: 72 sc (10 rows)
If you want to fix the hair from the inside, do it at this stage. I am attaching to MK DjOlechka, it looks like this.
Cut the threads of the desired length, note that they are folded in half, hook the folded thread in half into the head, the thread remains on the hook inside the head, pull out the hook and insert a new thread inside, dragging it through the thread that remained on the hook. Pull the threads constantly so that they do not hang inside the head.
Depending on the thickness of the thread, make 4-6 rows in a circle. If the thread is thick, through the column.
You mark the contour with additional thread, and fill it inside in the same way. Here I fasten, through sc, and where through a row, but along the contour line to each sc. At the end, for fixing, I am stitching it with an ordinary bobbin thread and coat with glue.
We take out the contour thread, continue knitting.
35 row: 22 sc, (2 sc, dec) * 3 times, 4 sc, (dec, 2 sc) * 3 times, 22 sc = 66 sc
36 row: 22 sc, (1 sc, dec) * 3 times, 4 sc, (dec, 1 sc) * 3 times, 22 sc = 60 sc
37 row: (8 sc, dec) * 6 times = 54 sc
38 row: (7 sc, dec) * 6 times = 48 sc
39 row: (6 sc, dec) * 6 times = 42 sc
40 row: (5 sc, dec) * 6 times = 36 sc
41 row: (4 sc, dec) * 6 times = 30 sc
42 row: (3 sc, dec) * 6 times = 24 sc
43 row: (2 sc, dec) * 6 times = 18 sc, fasten, leave the thread for hooks about 30 cm long, we stuff the head gently so that we can make the hooks.
Assembly:
We fasten our hands, at a distance of about 11 sc from the neck, for this we insert the ends of the wires on the sides.
Additionally, we fix the remaining thread for sewing, a stitch through the arm in the torso, in the second hand, 2-3 ties back and forth.
We bring the same thread through the body at the navel, make a tightening and fasten between the legs.
Head trimming:
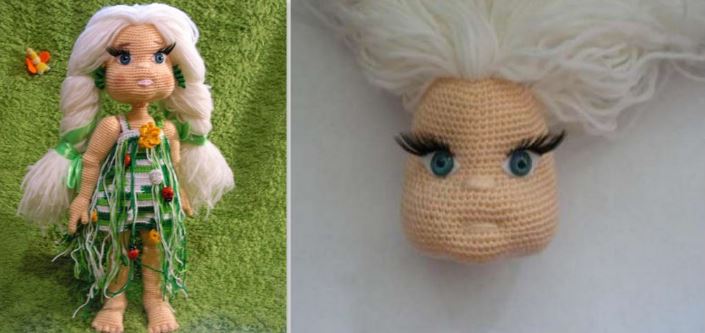
Black HN (nose) -22 row from the crown, distance between points 4 sc (between increments)
Black PP (chin) – 5-6 row from the bottom of the closure, the distance between the points 6 sc (1 sc to the left and right about the nose)
Blue G-D (eyes) – 2 rows above the nose, 3 sc to the left and right of the nose, the distance between the points 10sc.
Red G-D (lips) – 5 rows below the nose, 1 sc to the right and left of the nose, 6 sc long. First, we remember with our hands the places where the eyes will be, the mouth, whether the chosen distance is like, if not, you can transfer it to 1–2 sc, mark it.
Now in more detail.
For the nose, the thread is displayed in the 22nd row, between the increments of this row (4sc) and we make 5-6 screeds.
For tightening, I introduce the thread at the indicated points, but I bring it back 1 sc, in the chin back, in the eyes – 1 sc towards the ears and up.
We bring the thread to the chin, then to the orbit. We tighten the thread from time to time. We make 3-4 screed (eyes – chin) with straight screeds and oblique.
You can make another tightening between the eyes. We display in the mouth.
We make two ties, through the chin, returning to the same sc, without retreating anything, we pull it together just a little bit.
The thread is displayed and fixed. We stuff our heads, paying special attention to the cheeks.
We cut out eyes from white felt, glue the pupil, finished eyelashes.
Gently pink thread first around the upper thread of the lips, then
lower. We outline the ears.
We collect in a semicircle 8 sc, we bind, we fix the thread and hide it.
We embroider the eyebrows. If the clothes are removable, we sew the head by inserting it into the wire. My clothes cannot be removed, so first I put on a doll, then I sew on my head. If the hair is ready, we sew (glue) them. Brush the cheeks.
Now clothes, it is better if you try on and in the course of knitting, if necessary, adjust.
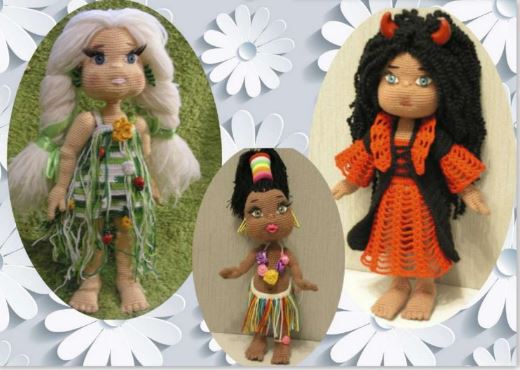
1. Hawaiian outfit:
Hip skirt:
We dial 46 ch 1 row: 3 loop from the hook, 44 dc, fasten the thread, cut.
In each column we attach 2 strings of the desired length, like a bahram.
Knotted on the hips. We knit beads from ch, decorate with flowers, put on the neck.
Earrings:
From colored paper clips bend the desired shape, insert into the ears.
Hairstyle:
We insert a hairpin directly into the head, raise the hair, tie it with rubber bands for money, and on top there are many multi-colored elastic bands for hair.
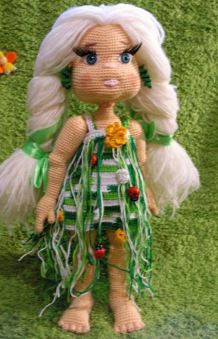
2. Green dress: threads COCO Print, color 4653, cr 1.5 We dial 44 ch, connect, knit a circle
1 row: 44sc at the end of each sl-st row.
2-6 row: 1 lifting loop, 44sc
7 row: at the beginning of each row we do 3 lifting loops, 10 dc, inc, 22 dc, inc, 10 dc = 46 dc
8 row: 10 dc, 2 inc dc, 22 dc, 2 inc dc, 10 dc = 50dc
9 row: 10 dc, 4 inc dc, 22 dc, 4 inc dc, 10 dc = 58 dc
10-13 row: 58 dc
14 row: 12 dc, 2 dec dc, 26 dc, 2dec dc, 12 dc = 54 dc
15-17 row: 54 dc, fasten the thread, hide it.
Webbing (2 pcs)
We dial 24 ch
1 row: in 3 loops from the hook 22 dc, fasten the thread, sew to the dress with ordinary threads of a suitable color.
We dial 46 ch
1 row: in 3 loops from the hook we knit 44 dc, fasten the thread.
In each column we hang the threads of the desired length as a bahram.
We sew dresses to the bodice, decorate with flowers, beads. Raise the hands of the doll and pull on the dress.
Earrings:
We dial 15 ch
In each eyelet we knit 3 sc, put it in our ears.
3. Outfit of Demonesses: threads Semenovskaya Carolina, cr 1.5
(red and black)
Red sundress:
We dial 44 ch, (the number of loops is a multiple of 4) we connect, then in a circle. At the end of each row is sl-st
1 row: 1 lift loop, 43 sc
2-6 row: 2 lifting loops, 43 dc
7-8 row: 3 lifting loops, skipping 1 dc, 3 ch, 3 columns, 4 columns (2 dc, ch, 2 dc), 3 ch, 3 columns skipping, (2 s1 n, ch, 2 dc) to the end of the row.
9-10 row: 3 lifting loops, there is 1 dc, 4 ch, 2 dc in ch between dc
the previous row, ch, 2 dc there, to the end of the row.
We knit in this way the desired length, adding 1 ch in each 3 rows.
Dressed on a doll, now you can sew on your head.
Black cloak:
Knit the back, dial 19 ch
1 row: in 3 loop from the hook 17 dc
2-4 row: 17 dc, thread fasten cut.
Shelves
Left:
On the back from the edge, we collect 2 lifting loops, 5 dc
1 row: 2 lift loops, 5 dc
2 row: 2 lifting loops, 4 dc, inc dc = 6 dc
3 row: 2 lift loops, 6 dc
4 row: 2 lifting loops, 6 dc, fasten and cut the thread.
Right:
On the back from the other side 2 lifting loops, 5 dc
1 row: 2 lift loops, 5 dc
2 row: 2 lifting loops, inc dc, 4 dc = 6 dc
3 row: 2 lift loops, 6 dc
4th row: 2 lifting loops, 6 dc, without breaking the thread we continue to knit on the back, 17 dc, then we knit on the left shelf 6 dc = 29 dc Next, we knit the same length as a sundress, making 2 increases in each row on each side. We tie the finished cloak: sl-st, ch, sl-st, ch ….
Sleeves:
We start to dial from the bottom, 20 dc We knit in a circle 5-6 rows, at the end of each row sl-st, at the beginning of 2 lifting loops.
Now we attach the red thread to the edge of the sleeve, knit 1 row sc and knit in the same pattern as the hem of the sundress, 6-7 rows, fasten the thread, crop.
On the neck, with a red thread, we begin to dial on the side of the shelf, from the place where we connected to the back, 32 sc, we knit 1 row sc. And then we knit a pattern of a sarafan of 5-6 rows, fasten the thread, hide it.
With a black thread we knit a chain of 50-60 ch, we put it in the dc along the edges of the shelves obliquely, we knit it at the back.
Here is our doll and ready!
