Bear Amigurumi Free Pattern
Hello dear visitors, I am here again with new amigurumi molds for you. I am sharing amigurumi patterns for you here for free. You can make your children happy by making these patterns. Amigurumi toys are very popular lately and are the most beautiful toys that don’t harm your kids. Your kids will love them. Let’s move on to our pattern and give them this gift.
Legend:
Ch – air loop
MR – amigurumi ring
İnc – increase
Dec – decrease
Sc – single crochet
Hdc double crochet
Dc double crochet
Materials
The bear is knitted of Alize Angora Real 40 yarn (wool 40%, acrylic 60%)
B 100gr-480m
Hook 1.25.
The bear is knitted in one piece from the feet to the crown.
It is imperative to use a frame so that the toy holds
shape, and most importantly the head because the bear’s neck is very thin.
LEGS-BODY
We start knitting from the feet. The marker runs strictly behind the leg.
Left leg
9 Ch
We start knitting in the second loop of the chain.
1p-7Sc., 3Sc in one loop, on the other side of the chain 6Sc., İnc = 18p
2p-İnc., 6Sc., İnc.х3,6Sc., İnc.х2 = 24p
3p-1Sc., İnc., 6Hdc., (1Sc., İnc) x3.6Hdc., (1Sc., İnc) x2 = 30p
4p-İnc., 4Hdc., 8Dc., İnc.Dcх3., 8Dc., 4Hdc., İncх2 = 36p
5p-7p -36Sc (3 rows)
8p- (4Sc., Dec) x6 = 30p
9p-30Sc
10p- (3Sc., Dec) x6 = 24p + 1 offset loop
11p-3Sc., (1Sc., Dec) x6., 3Sc., = 18p
Start stuffing your foot. Do not stuff the sock too much, there will be tightening
for fingers.
Now cut off a piece of wire (I have 35cm), make a loop, insert it into
tap the foot and around the wire with padding.
12p-3Sc., Dec.x6., 3Sc., = 12p
13r-17r-12Sc (5 rows)
18p-10Sc, 2Sc leave, do not tie to the end of the row.
When we connect with the right leg, then these two loops will be the first loops.
We tear off the thread. Fill.
Right leg
9 Ch
We start knitting in the second loop of the chain.
1p-7Sc., 3Sc in one loop, on the other side of the chain 6Sc., İnc. = 18p
2p-İnc., 6Sc., İnc.х3,6Sc., İnc.х2 = 24p
3p-1Sc., İnc., 6Hdc., (1Sc., İnc) x3.6Hdc., (1Sc., İnc) x2 = 30p
4p-İnc., 4Hdc., 8Dc., İnc.Dcх3., 8Dc., 4Hdc., İncх2 = 36p
5p-7p -36Sc (3 rows)
8p- (4Sc., Dec) x6 = 30p
9p-30Sc
10p- (3Sc., Dec) x6 = 24p + 1 offset loop
11p-3Sc., (1Sc., Dec) x6., 3Sc., = 18p
Start stuffing your foot. Do not stuff the sock too much, there will be tightening for fingers.
Now cut off a piece of wire (I have 35cm), make a loop, insert it into tap the foot and around the wire with padding.
12p-3Sc., Dec.x6., 3Sc., = 12p
13p-18p-12Sc (6 rows) we make 2 offset loops Fill.
We do not tear off the thread, we continue knitting.
Next, we will connect the legs together and into the body.
Body.
19p-3Sc on the right leg, 6 Ch, now take the left leg and start
knitting from the remaining untied stitches 12Sc. on the left leg,
6Sc. after Ch., 9Sc. on the right leg.
20p- 3Sc., 6Sc. on Ch., 3Sc., (İnc., 1Sc) х3., 12Sc.- (3Sc on the left
leg + 6Sc along the chain from Ch., + 3Sc. on the right leg = 12Sc).,
(1Sc., İnc.) X3 = 42p
After row 20, the thread should be in the center of the right leg, behind.
About the wire.
Twist two wires from the legs together, but twist only the length of the body plus the neck, in the head two wires should be separate.
21r-22r-42Sc (2 rows)
23р-4Sc., İnch6., (İncavki for priests), 12Sc., (İnc., 1Sc) x6., (Increments for
tummy), 8Sc. = 54p
24p-26r-54Sc. (3rd row)
27p- (8Sc., İnc) x6 = 60p
28p-60Sc
29p-5Sc., İnc., (9Sc., İnc) х5,4Sc. = 66p
30r-37r-66Sc (8 rows)
38p-40Sc., (Dec., 1Sc) x6., 8Sc. = 60p decreases in the middle of the tummy
39p-60Sc
40p-35Sc., (Dec., 1Sc) x6., 7Sc. = 54p decreases in the middle of the tummy
41r-43r-54Sc (3 rows)
44p- (3Sc., Dec) x6., 24Sc. = 48p
We begin to stuff the body and then, as the body knits, continue stuffing.
45r-46r- 48Sc.
47p- (6Sc., Dec.) X6 = 42p
48p-42Sc.
49p- (5Sc., Dec) x6 = 36p
50p-36Sc.
51p- (4Sc., Dec) x6 = 30p
52p-30Sc.
53p- (3Sc., Dec) x6 = 24p
54p- (2Sc., Dec) x6 = 18p
55p-18Sc fill to the end
Neck.
56p-Dec.x9 = 9p
57r-58r-9Sc. (2 rows)
Let’s move on to knitting the head.
Head.
59p-İncx9 = 18p.
60p- (2Sc., İnc) x6 = 24p.
61p- (3Sc., İnc) x6 = 30p.
62p- (4Sc., İnc) x6 = 36p.
63p- (5Sc., İnc) x6 = 42p.
64p- (6Sc., İnc) x6 = 48p.
65p- (7Sc., İnc) x6 = 54p.
66p- (8Sc., İnc) x6 = 60p.
67p- (9Sc., İnc) x6 = 66p.
68p- (10Sc., İnc) x6 = 72p.
69p- (11Sc., İnc) x6 = 78p.
70p- (12Sc., İnc) x6 = 84p.
71r-78r-84Sc. (8 rows)
Make such a structure from wire as in the photo, this is for stability
bear heads. The head is large on a thin neck. Will help the same
bend the head to the sides.
From this point on, you can gradually and carefully fill your head.
The wire should not touch the head, but be inside it. And around
wire packing.
It is better to start stuffing in small lumps, so that gradually
fill the entire head space.
79p-6Sc., Dec., (12Sc., Dec) x5., 6Sc = 78p.
80p-78Sc.
81p- (11Sc., Dec) x6 = 72p.
82p-72Sc.
83р-5Sc., Dec., (10Sc., Dec) х5., 5Sc = 66p.
84p-66Sc.
85p- (9Sc., Dec) x6 = 60p.
86p-60Sc.
87p-4Sc., Dec., (8Sc., Dec) x5., 4Sc = 54p.
88p-54Sc.
89p- (7Sc., Dec) x6 = 48p.
90p-48Sc.
91p-3Sc., Dec., (6Sc., Dec) x5., 3Sc = 42p.
92p-42Sc.
93p- (5Sc., Dec) x6 = 36p.
94p-2Sc., Dec., (4Sc., Dec) x5., 2Sc = 30p.
95p- (3Sc., Dec) x6 = 24p.
96р-1Sc., Dec., (2Sc., Dec) х5., 1Sc = 18p.
97p- (1Sc., Dec) x6 = 12p to fill
98p-Decx6.
Hands. (2 parts)
1p-6Sc. in MR
2p-İnc.x6 = 12p
3p- (1Sc, İnc.) X6 = 18p
4p- (2Sc, İnc.) X6 = 24p
5p-8p-24Sc. (4 rows)
9p- (2Sc., Dec) x6 = 18p
10p-11p- 18Sc. (2 rows)
12p- (1Sc., Dec) x6 = 12p Fill the palm, but very weakly, so that later you can
was on it to pull your fingers.
13p-30p- 12Sc (18 rows)
Now you need to cut off a piece of wire so that it sticks out of the handle by 1.5-2 cm longer, but insert the wire only after tightening your fingers.
Flatten the palm and embroider two stitches for the fingers, slightly tightening. Fill the handle a little.
Muzzle.
(from finishing yarn)
3 Ch
We knit in rotary rows, at the end of each row we make Ch
We start with the second loop of the chain
1p-İnc.x2 = 4Sc Ch turn
2p-İnc., 2Sc., İnc. = 6Sc Ch turn
3p-İnc., 4Sc., İnc. = 8Sc Ch turn
4p-İnc., 6Sc., İnc. = 10Sc Ch turn
5p-İnc., 8Sc., İnc. = 12Sc Ch turn
6p-İnc., 10Sc., İnc. = 14Sc Ch turn
7p-16p- 14Sc (10 rows) Ch turn
17p-Dec., 10Sc., Dec. = 12Sc Ch turn
18p-Dec., 8Sc., Dec. = 10Sc Ch turn
19p-Dec., 6Sc., Dec. = 8Sc Ch turn
20p-Dec., 4Sc., Dec. = 6Sc Ch turn
21p-Dec., 2Sc., Dec. = 4Sc Ch turn
22p-Dec.x2 = 2Sc without turning,
tie the entire muzzle around the perimeter with 2 rows of Sc.
Ears. (2 parts)
1p-6Sc. in MR
2p-İnc.x6 = 12p
3p- (1Sc, İnc.) X6 = 18p
4p- (2Sc, İnc.) X6 = 24p
5p- (3Sc, İnc.) X6 = 30p
6p-9p-30Sc. (4 rows)
Fold the ear in half and tie the bottom edge in two layers with 15Sc.
Inner eyelet.
(from finishing yarn) 2 parts.
9 Ch
Knit in pivoting rows, at the end of the row do Ch
We start knitting from the second loop of the chain.
1p-3p-8Sc., (3 rows) Ch turn
4p-Dec., 4Sc., Dec. = 6Sc Ch turn
5p-Dec., 2Sc., Dec. = 4Sc thread break
Sew the eyelet neatly into the main ear.
The inner eyelet can be cut out of fabric.
Belly pad.
(from finishing yarn) 1 piece.
1p-6Sc. in MR
2p-İnc.x6 = 12p
3p- (1Sc, İnc.) X6 = 18p
4p- (2Sc, İnc.) X6 = 24p
5p- (3Sc, İnc.) X6 = 30p
6p- (4Sc, İnc.) X6 = 36p
Break the thread.
Assembly.
Before starting the assembly, you need to comb all the parts. Can Velcro, you can use a slicker.
Comb very carefully so as not to change the shape of the parts.
Colored pins can be inserted in the center of the tummy and in the center of the head, so that when assembling, you orient yourself and arrange the bear symmetrically.
You can immediately sew the patch on the tummy, this will also help to determine with the center of the bear shape.
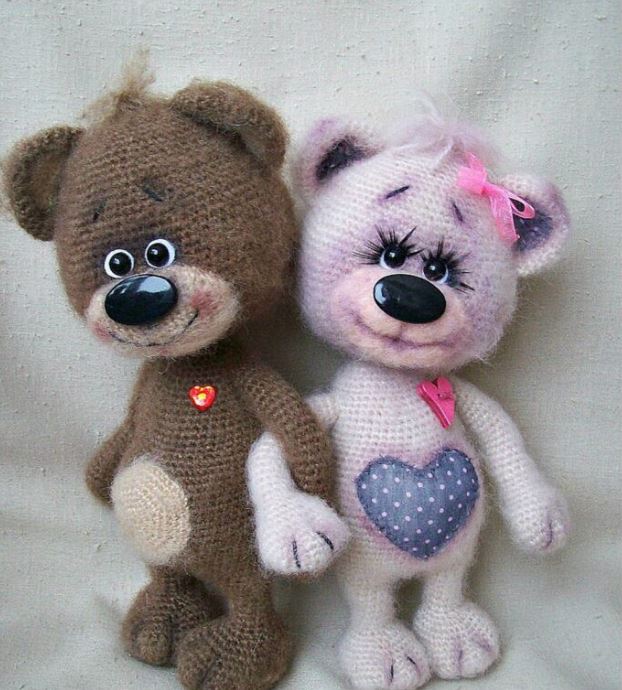
Sew on the muzzle, be sure to add filler, but not much to the muzzle did not stick out forward, but, as it were, protruded slightly forward. It located not in the center of the head, but much downward. Somewhere from row 65 (or through 6 rows from the neck) and up.
Sew on the ears. The bear’s head is not round, and you can see how there are places for ears.
Make a small eye tighten. To do this, insert the needle behind the head at neck and withdraw into the first eye, tighten a little, return, then from the neck withdraw into the second eye and back to the neck. Tighten slightly and fasten the thread.
And because our eyes will be located very close to each other, then we can with one stitch to capture the entire area intended for the eyes, and slightly pull, do not pull strongly, otherwise they may look like they have failed.
This option will deepen the eyes evenly.
Choose the nose and eyes at your discretion. But it is better that the nose is not small, I have a length of 2.5 cm If there is no nozzle suitable for the size, it is easy to make it out of plastic or dump it, but you can find a button and cover it with a cloth. There are many options.
Place the eyes just above the muzzle and very close to each other.
Stick the handles with a protruding wire into the body on the sides in the region of 49-50 rows,
sew on. Make sure your arms are symmetrical.
Sew on the tummy on the most convex part of the belly, a drop add filler.
Embroider a smile and eyebrows. Embroider a smile in one thread so that it is so not very noticeable, but the eyebrows are better in two strings. Embroider the same fingers and toes.
You can tint the bear a little – cheeks, eyebrows.
Cut several threads from the main yarn and string them on the crown heads (where we closed the last loops) as we string the fringe.
Cut to desired length and fluff. It will be a forelock.
The bear can be made with a felted muzzle and a felted nose. Eyes made of plastic. Sew on patches.
The bear is ready. And you can decorate it as you wish.