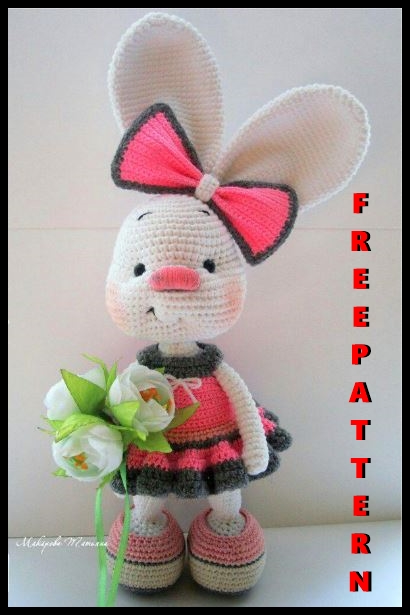
Crochet Cute Bunny Free Amigurumi Pattern
Hello dear visitors, I am here again with new amigurumi molds for you. I am sharing amigurumi patterns for you here for free. You can make your children happy by making these patterns. Amigurumi toys are very popular lately and are the most beautiful toys that don’t harm your kids. Your kids will love them. Let’s move on to our pattern and give them this gift.
ABBREVIATIONS:
Mr: Magic ring,
sc: single crochet,
İnc: increase,
DEC decrease,
x: repeat.
BLO: Back Loop only,
FLO: Front Loop only,
DC: Double crochet.
The size of the finished toy with my materials is 27-28 cm (with ears)
Toy size depends from the thickness of the yarn, hook thickness and knitting density!
Materials:
yarnart yarn “jeans” (cotton / acrylic) 50g / 160m
– white (a little more than the 1st hank),
– a little blue and light brown.
• yarnart yarnart “etamin” (acrylic) 30g / 180m blue
• yarnart yarn “violet” (cotton) 50g / 282m No. 3194
• cotton light pink yarn for embroidery of a nose (I used yarnart “begonia” yarn)
• hook number 1,6
• holofiber (or other filler)
• wire (approximately 1.5 meters)
• black beads for eyes 6-8 mm
• dry oil pastel or pink pencil for tinting cheeks
Head
1 row: 6 sc in amigurumi ring (6)
2 row: 6 inc (12)
3 row: (1 sc, 1 inc) x6 times (18)
4 row: (2 sc, 1 inc) x6 times (24)
5 row: (3 sc, 1 inc) x6 times (30)
6 row: (4 sc, 1 inc) x6 times (36)
7 row: 36 sc
8 row: (5 sc, 1 inc) x6 times (42)
9 row: 42 sc
10 row: (6 sc, 1 inc) x6 times (48)
11-14 row: 48 sc
15 row: 12 inc for the front loop, 4 sc, 12 inc for the front loop, 20 sc (72)
16 row: 72 sc
17 row: 52 sc, 1 dec, 16 sc, 1 dec (70)
18 row: 52 sc, 1 dec, 14 sc, 1 dec (68)
19 row: 52 sc, 1 dec, 12 sc, 1 dec (66)
20 row: 52 sc, 1 dec, 10 sc, 1 dec (64)
21 rows: 52 sc, 1 dec, 8 sc, 1 dec (62)
22 row: 52 sc, 1 dec, 6 sc, 1 dec (60)
23 row: 60 sc
24 row: (8 sc, 1 dec) x6 times (54)
25 row: (2 sc, 1 dec) x5 times, 8 sc, (1 dec, 2 sc) x6 times, 1 dec (42)
26 row: (1 sc, 1 dec) x5 times, 8 sc, (1 dec, 1 sc) x5 times, 2 dec (30)
27 row: (3 sc, 1 dec) x6 times (24)
28 row: (2 sc, 1 dec) x6 times (18)
29 row: (1 sc, 1 dec) x6 times (12)
Finish sl-st, cut the thread.Tightly stuff the part.
Ears (2 parts)
1 row: 6 sc in amigurumi ring (6)
2 row: 6 inc (12)
3 row: (3 inc, 3 sc) x2 times (18)
4th row: ((1 sc, inc) x3 times, 3 sc) x2 times (24)
5 row: 5 sc, inc, 11 sc, inc, 6 sc (26)
6 row: 5 sc, 2 inc, 11 sc, 2 inc, 6 sc (30)
7 row: 30 sc
8 row: 6 sc, 2 inc, 13 sc, 2 inc, 7 sc (34)
9 row: 34 sc
10 row: 7 sc, 2 inc, 15 sc, 2 inc, 8 sc (38)
11-32 row: 38 sc (22 rows)
Finish sl-st, leave thread for sewing, do not stuff.
Arms (2 parts)
1 row: 6 sc in amigurumi ring (6)
2 row: 6 inc (12)
3-4 row: 12 sc
5 row: 3 dec, 6 sc (9)
6 row: 1 sc, inc, 7 sc (10)
7-20 row: 10 sc (14 rows)
Finish sl-st, leave thread for sewing, do not stuff.
Variety of cuts
I twist as I knit (first one leg, then the other, then the arms, etc.).
It will require approximately 1.5 meters of wire. If a it is advisable to wrap the wire without braid with adhesive tape.
The photo shows how roughly the frame inside the toy looks.
Knitting with a frame is not very convenient, but you will succeed!
Legs (2 parts)
1 row: dial 9 ch, from the 2nd loop from the hook knit 7 sc, 3 sc in one loop,
on the other side 6 sc, 1 inc (18)
2 row: 2 inc, 4 sc, 5 inc, 4 sc, 3 inc (28)
3 row: (1 sc, 1 inc) x2 times, 4 sc, (1 sc, 1 inc) x5 times, 4 sc, (1 sc, 1 inc) x3 times (38)
4th row: (2 sc, 1 inc) x2 times, 4 sc, (2 sc, 1 inc) x5 times, 4 sc, (2 sc, 1 inc) x3 times (48)
5-7 row: 48 sc
8 row: (6 sc, 1 dec) x6 times (42)
9 row: 12 sc, 9 dec, 12 sc (33)
10 row: (9 sc, 1 dec) x3 times (30)
11 row: 9 sc, 6 dec, 9 sc (24)
12 row: (2 sc, 1 dec) x6 times (18)
Insert wire, stuff
13 row: 3 sc, 6 dec, 3 sc (12)
14-15 row: 12 sc
16 row: (3 sc, 1 inc) x3 times (15)
17-20 row: 15 sc
21 row: (4 sc, 1 inc) x3 times (18)
22-25 row: 18 sc
Finish sl-st, cut the thread, fill.
You need to fill your feet pretty tight so as not to there were folds! For more even soles put insole and for better stability put weighting (pebbles, coins, etc.)
Body
Stuff in the course of knitting
26 row: start knitting from the middle of the inner part of the left leg (5 sc, 1 inc) x3 times, 3 ch, on the right foot (from the middle of the inside)(5 sc, 1 inc) x3 times
27 row: 3 sc on a chain of ch, 21 sc, 3 sc on the other side of a chain of ch, 21 sc(the result should be a circular row of 48 sc)
28-34 row: 48 sc
35 row: (6 sc, 1 dec) x6 times (42)
36-37 row: 42 sc
38 row: (5 sc, 1 dec) x6 times (36)
39-40 row: 36 sc
41 row: (4 sc, 1 dec) x6 times (30)
42-43 row: 30 sc
44 row: (3 sc, 1 dec) x6 times (24)
45 row: 24 scIn the next row we display the wire for pens.Fill the body well, bend the wire and try onpens.
46 row: (2 sc, 1 dec) x6 times (18) – in this row we display the wire for pens
47-49 row: 18 sc
50 row: (1 sc, 1 dec) x6 times (12)
Finish sl-st, leave thread for sewing, fill well.
• Now can to sew pens.
Tail
1 row: 6 sc in amigurumi ring (6)
2 row: 6 inc (12)
3 row: 12 sc
4 row: (2 sc, 1 dec) x3 times (9)
Finish sl-st, leave thread for sewing, fill.
Mark the points – the places of the hair extensions and the places where the nose and eyebrows will be.
Find the 15th row on the face:(12 inc for the front loop, 4 sc, 12 inc for the front loop, 20 sc). Blue dotsin the photo I marked 4 sc which are between increments. Be guided by them at a marking.
EYES – between 14 and 15 rows, between eyes 10 sc
NOS – 6 sc wide and 2 rows high – the top points between 15 and 16 rows
EYEBROWS – the top points between the 6th and 7th rows, between the eyebrows 7 sc
How to make a weight loss:
At one point we insert a needle – at another we withdraw. Spend back by sweeping nearby after 1a loop. Pull the thread, tighten the knot. Can be repeated again for better fixation.tightening.
With numbers I marked the points that we will pull together.
1. To tighten points 1-3-4-2
2. Tighten points 2-5-6-1
3. To tighten points 2-7-8-1
4. To tighten points 4-7-8-3
5. To tighten points 4-5-6-3
6. Lay the thread over the line from one corner of the mouth to the other and the nose bridge from one eye to slightly tighten to the other and tighten a little
7. Thread a smile line
8. Glue the eyes
RESPONSE
Look if the markings of the nose are “gone” to the side after tightening. If necessary, align marking focusing on the eyes.
– Lay the thread of the nose border and embroider the 1st layer.
– We don’t insert a needle into the toy, we enter the needle only under the threads with which thenose is delimited.
– Do not tighten the thread. Make sure that the thread lies evenly.
We also embroider the 2nd layer,only now horizontally.
And again we don’t introduce the needle into the toy,
but only for thread-delimiters.
And the last 3rd layer is embroidered very carefully so that the thread to the thread lay.
The needle is now inserted into the toy, clearly between the rows.
From all 4 sides of the spout we make stitches, slightly pulling the thread (we form a beautiful shape).
We fix the thread and hide it inside the toy.
The nose is ready. If desired, it can be tinted and varnished.
• Embroider eyebrows and mouth with black thread.
• Tint the cheeks.
• Sew your ears based on the photo.
Fold your ear like in the photo and lock with stitches. Pull it well.
Sew on the ears to tightly one to the other.
Shoes
Start with a light brown yarn.
1 row: dial 9 ch, 7 sc from the second loop from the hook, 3 sc into one loop, on the other side 6 sc, 1 inc (18)
2 row: 1 inc, 6 sc, 3 inc, 6 sc, 2 inc (24)
3 row: 1 sc, 1 inc, 6 sc, (1 sc, 1 inc) x3 times, 6 sc, (1 sc, 1 inc) x2 times (30)
4 row: 2 sc, 1 inc, 6 sc, (2 sc, 1 inc) x3 times, 6 sc, (2 sc, 1 inc) x2 times (36)
5 row: 3 sc, 1 inc, 6 sc, (3 sc, 1 inc) x3 times, 6 sc, (3 sc, 1 inc) x2 times (42)
6 row: 4 sc, 1 inc, 6 sc, (4 sc, 1 inc) x3 times, 6 sc, (4 sc, 1 inc) x2 times (48)
Change the yarn to blue.
7 row: behind the back loop 48 sc
8-11 row: 48 sc
Change the yarn to blue (ethamine).
12-14 row: 48 sc
The next rows are better to knit
putting shoes on the leg, otherwise later
it will be impossible to dress him.
15 row: (6 sc, 1 dec) x6 times (42)
Level the marker!
16 row: 15 sc, 6 dec, 15 sc (36)
17 row: (4 sc, 1 dec) x6 times (30)
Finish sl-st, fasten and hide the thread.
Note!
The marker should be located along the axis of the visually passing through the initial chain of 9 air loops.
Vest
Start with blue yarn (jeans)We knit a belt:Make a chain of 56 air loops
1 row: from the second loop from the hook, knit 55 sc, turn work (55)
2 row: 1 ch, 55 sc (55)
To the other side of the chain of 56 air loopswe attach blue yarn (ethamine) and knit
dress top:
• – knit in straight and rotary rows
• – each new row starts with 1 ch
1-7 row: 55 sc
8 row: (8 sc, 1 dec) x2 times, (7sc, 1 dec) x3 times, 8 sc (50)
9 row: 50 sc
10 row: 6 sc, 1 dec, (7 sc, 1 dec) x4 times, 6 sc (45)
11 row: 45 sc
12 row: (6 sc, 1 dec) x5 times, 5 sc (40)
13 row: 6 sc, 10 ch, skip 8 sc (for armhole)12 sc, 10 ch, skip 8 sc, 6 sc
14th row: 6 sc, 10 sc in a chain of 10 ch, 12 sc, 10 sc in a chain of 10 ch, 6 sc (44)
15 row: 5 sc, 1 dec, 8 sc, 1 dec, 10 sc, 1 dec, 8 sc, 1 dec, 5 sc (40)
16 row: 4 sc, 1 dec, (3 sc, 1 dec) x2 times, 8 sc, 1 dec, (3 sc, 1 dec) x2 times, 4 sc (34)
17 row: 4 sc, 1 dec, (2 sc, 1 dec) x2 times, 6 sc, 1 dec, (2 sc, 1 dec) x2 times, 4 sc (28)
Finish, leave the thread for stitching the dress.
The bottom of the dress consists of:
• Lace skirt – attach to the 2nd row of the belt (front loops)
• Petticoat – attach to the 2nd row of the belt (back loops)
The scheme of the lace skirt:(yarnart “violet”)
Petticoat:
Attach blue yarn (ethamine)
• knit in straight and rotary rows
• each new row starts with 2 ch
1 row: knit in each loop (1 dc, 1 ch)
2-4 row: knit under each ch of the previous row (1 dc, 1 ch)
5 row: knit under each ch of the previous row (2 dc, 1 ch)
6 row: knit dc over each column and over each ch
7 row: all dc8 row: all sc
• Sew on your head.
• Wear a dress. Sew on the back.
Ribbon
Blue yarn (ethamine)
• knit in straight and rotary rows
• each new row starts with 1 chDial a chain of 35 air loops
1 row: from the second loop from the hook, knit 34 sc
2-16 row: 34 sc
Attach the violet yarn and knit around sc
Jumper bow (“violet”):
Dial 10 ch, 8 sc from the second loop from the hook, 3 sc into one loop,on the other side 7 sc, 1 inc (20)
Finish sl-st, leave thread to staple.
Wrap the middle of the bow with a jumper and sewjumper edges on the back of the bow.
Sew a bow to the ears.
Bag
Start with a light brown yarn.
1 row: dial 6 ch, 4 sc from the second loop from the hook, 3 sc into one loop,on the other side 3 sc, 1 inc (12)
2 row: 1 inc, 3 sc, 3 inc, 3 sc, 2 inc (18)
3 row: 1 sc, 1 inc, 3 sc, (1 sc, 1 inc) x3 times, 3 sc, (1 sc, 1 inc) x2 times (24)
Change yarn to blue (jeans)
4 row: for the back loop (2 sc, 1 inc) x8 times (32)
5-12 row: 32 sc
13 row: 30 sc, 2 sl-st, 3 ch lift
14 row: knit through 1 column (1 dc, 1 ch), end the row sl-st
15-16 row: 32 sc
Tie with a “step step”
For the handle of the handbag dial 23 ch, from the second loopknit 22 sc from the hook.
Sew to the purse from the inside between 15 and 16 rows.
For the rope dial 130 ch with yarn “violet” and from the second