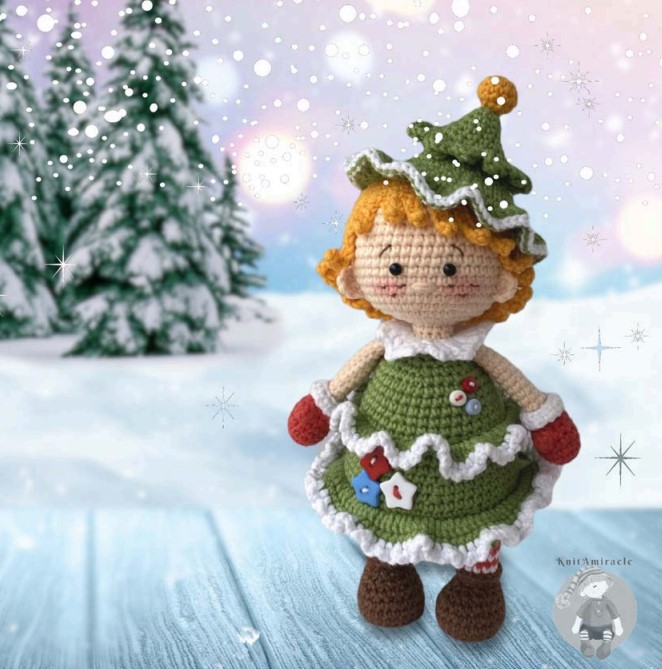
Cute Crochet Amigurumi Christmas Doll Free Pattern
Hello dear visitors, I am here again with new amigurumi molds for you. I am sharing amigurumi patterns for you here for free. You can make your children happy by making these patterns. Amigurumi toys are very popular lately and are the most beautiful toys that don’t harm your kids. Your kids will love them. Let’s move on to our pattern and give them this gift.
Materials
Alize Cotton Gold, cotton (55%), acrylic (45%), 330 m – 100 g. Weight: Sport (5 ply)
color yellow (83) (for the for the hair). 5 g of the yarn.
color white (55) (for the collar, socks and decoration of the skirt and mittens) – small
amount of the yarn.
YarnArt Jeans, Weight: Sport (5 ply)
color skin (73) (for the head and arms of the doll). 5 g of the yarn.
color green (69) (for the hat and body (the dress). 10 g of the yarn.
color dark brown (70) (for boots) – small amount of the yarn.
color red (26) (for the stripes on the socks and mittens) – small amount of the yarn.
Crochet hooks: 2 mm (B/1- US, 14- UK), 2,5 mm (C/2 – US, 12 – UK).
A pair of eyes for toys or two halfbeads Ø 4 mm (0,16 inch)
Chopstick (or any other wooden stick with a blunt end) – for the stuffing of the toy.
Washable polyester filling for the stuffing of the toy.
Yarn needle – a long needle for assembling of the toy.
Three small buttons Ø 6 mm (0,24 inch) and three star buttons to decorate the dress
2-3 cotton buds to strengthen the neck
If you use the materials as advised above the final size of the toy is going to be 22 cm
(approximately 8,5″) from top of the head (with a hat) to toes.
Abbreviations
R- row
MR – Magic ring;
St/Sts – stitch/stitches
ch – chain stitch;
sl st – slip stitch;
sc – single crochet;
dc – double crochet;
dec- decreasing (2 sc/dc together);
inc – increasing (2 sc/dc in 1 st);
sc3tog- decreasing (3 sc together);
tr – triple crochet;
3 dc cluster-3 dc joined at the top.
Arms (2 piece)
Use a 2 mm crochet hook and red colored yarn. Start at the
underside of the arm.
R 1: 6 sc in MR (6)
R 2: 6 inc (12)
R 3-5: 1 sc in each stitch around (12)
R 6: 5 sc, 3 dc cluster, 6 sc (12)
R 7: 4 sc, sc3tog, 5 sc (10)
R 8: 1 sc in each stitch around (10)
Cut off the red colored yarn and attach the skin yarn
R 9: into the back loop of the stitch: 1 dec, 8 sc (9)
Stuff the ready part of the hand. Do not put the filling into the
rest of the arm.
R 10-19: 1 sc in each stitch around (9)
Fold the top of the arm and do 4 sc going
through both sides of the arm to make it flat.
Cut off the yarn.
Decoration for the upper part of the mittens
Use 2 mm hook. Attach the white yarn to the front loops of the remaining stitches of the 8th
row. Insert the hook from the bottom part up (from the hand in the direction of the shoulder).
R 1: (2 sc, 1 inc) 3 times, 1 sc (13)
R 2: crochet into the front loop only: (1 sc, 1 ch) in each stitch around
Cut off the yarn and make a needle join. Turn the last row out.
Legs, body and head (1 pieces)
We begin crocheting from the feet/boots and legs of the doll.
Use a 2mm crochet hook and dark brown colored yarn.
R 1: 6 sc in MR (6)
R 2: 6 inc (12)
R 3: (1 sc, 1 inc) 6 times (18)
R 4: 1 sc, 1 inc, (2 sc, 1 inc) 5 times, 1 sc (24)
Cut out two thick carton or plastic insoles of the matching size.
R 5: into the back loop of the stitch: 24 sc (24)
R 6-7: 1 sc in each stitch around (24)
R 8: 6 sc, (1 sc, 1 dec) 4 times, 6 sc (20)
R 9: 6 sc, 4 dec, 6 sc (16)
Insert the insoles into the boots.
R 10: 5 sc, 3 dec, 5 sc (13)
R 11: 1 dec, 11 sc (12)
Do not cut off, leave the yarn in front of the detail so that
you can finish the upper part of the boot later.
Attach the red yarn
R 12: into the back loop of the stitch: 12 sc (12)
Attach the white yarn
R 13: 1 sc in each stitch around (12)
Stuff the boot tightly, avoid stretching the stitches.
Change to red colored yarn
R 14: 1 sc in each stitch around (12)
Change to white colored yarn
R 15: 1 sc in each stitch around (12)
Cut off the white yarn and continue with red yarn.
R 16: 1 sc in each stitch around (12)
Cut off the yarn and make a needle join.
Finishing the upper part of the boot.
Use a 2mm crochet hook.
Go back to the front loops of the 11th row and use the remaining piece of the brown yarn.
Crochet: (1 ch, 1 sc) in the 1st stitch, 1 sc, 1 inc, (2 sc, 1 inc) 3 times, sl st in the 1st sc of the
round to join.
Cut off and fix the yarn. Repeat for the second leg.
Stuff the legs tightly.
Legs, body and head (1 pieces)
Use a 2 mm crochet hook and green colored yarn.
R 1: 6 sc in MR (6)
R 2: 6 inc (12)
R 3: (1 sc, 1 inc) 6 times (18)
We are going to attach the legs in the next row.
Mark with the help of the markers three stitches on inner side of each of the two legs. These
marked stitches we are going to crochet together with the stitches of the body.
The beginning of the row is in the center of the back. We attach the legs to the sides of the
crocheted circle.
R 4: 1 inc, 2 sc following the body, then 3 sc crocheting the body and left leg stitches together,
again (1 inc, 2 sc) 2 times on the body only, followed by 3 sc crocheting the body and right leg
stitches together, 1 inc, 2 sc on the body only (22)
R 5: 3 sc, 1 inc following the body, 9 sc following the remaining left leg stitches, then (3 sc, 1
inc) 2 times following the body, again 9 sc following the remaining stitches of the right leg,
followed by (3 sc, 1 inc) crocheting the body (38)
Further on please pay attention that the center of the row marker stays in the center of the back.
If needed add one or more floating loop stitches.
R 6: 4 sc, 1 inc, 9 sc, 1 inc, 8 sc, 1 inc, 9 sc, 1 inc, 4 sc (42)
R 7: 3 sc, 1 inc, (6 sc, 1 inc) 5 times, 3 sc (48)
R 8: (7 sc, 1 inc) 6 times (54)
R 9: 4 sc, 1 inc, (8 sc, 1 inc) 5 times, 4 sc (60)
R 10-13: 1 sc in each stitch around (60)
R 14: into the back loop of the stitch: 4 sc, 1 dec, (8 sc, 1 dec) 5 times, 4 sc (54)
R 15: 1 sc in each stitch around (54)
R 16: 8 sc, 1 dec, (16 sc, 1 dec) 2 times, 8 sc (51)
R 17: (15 sc, 1 dec) 3 times (48)
R 18: 7 sc, 1 dec, (14 sc, 1 dec) 2 times, 7 sc (45)
R 19-20: 1 sc in each stitch around (45)
R 21: (13 sc, 1 dec) 3 times (42)
R 22: into the back loop of the stitch: 6 sc, 1 dec, (12 sc, 1 dec) 2 times, 6 sc (39)
R 23: 1 sc in each stitch around (39)
R 24: (11 sc, 1 dec) 3 times (36)
R 25: 1 sc in each stitch around (36)
R 26: 5 sc, 1 dec, (10 sc, 1 dec) 2 times, 5 sc (33)
R 27: 1 sc in each stitch around (33)
R 28: (9 sc, 1 dec) 3 times (30)
R 29: (3 sc, 1 dec) 6 times (24)
R 30: 1 sc, 1 dec, (2 sc, 1 dec) 5 times, 1 sc (18)
We are going to crochet in the arms in the following row.
Check the center of the row marker to make sure it is in the center of the back. If needed add
one or more floating loop stitches and move the marker.
We are marking the places for the arms. The arms should be placed centered on the sides of the
body taking 4 sc on the sides and spaced 6 sc on the front and 4 sc on the back (see photos
below for reference).
This is how I got it done:
R 31: 3 sc following the body, then 4 sc crocheting the body and arm stitches together, again
6 sc on the body only, followed by 4 sc crocheting the body and arm stitches together, 1 sc on
the body only (18)
R 32: (1 sc, 1 dec) 6 times (12)
Cut off the yarn and make a needle join.
At this point we are going to make the collar and ruffles on the skirt and then we will
proceed with the main detail.
The collar
Use a 2 mm crochet hook and white colored yarn.
Attach the yarn to the back loops of the 32nd row stitches, insert the hook from the top down in
the direction from the neck downwards and crochet the following:
(4 ch (counts as 1st tr +1 ch), tr) in 1st st, 3 ch, (tr, 1 ch, tr) in next st repeat the pattern
between the asterisks to the end of the row, 3 ch, 1 sl st in 3rd ch
Cut and fasten off the yarn.
Upper dress ruffle.
Use a 2 mm crochet hook and green colored yarn.
Attach the yarn at the center of the back to the front loops of the 21st row stitches. Insert the
hook from the top down in the direction from the neck downwards and crochet the following:
R 1: 2 ch, 2 dc in each stitch around, sl st in 1st dc (120)
Cut off the green colored yarn and attach the white yarn
R 2: 1 ch, (1 sc, 2 ch) in each stitch around, sl st in 1st sc
Cut and fasten off the yarn.
Lower dress ruffle.
Use a 2 mm crochet hook and green colored yarn.
Attach the yarn at the center of the back to the front loops of the 13th row stitches.
R 1: 2 ch, (1 dc, 1 inc) repeat until the end of row, sl st in 1st dc (90)
R 2: 1 ch, 1 sc in each stitch around, sl st in 1st ch
Cut off the green colored yarn and attach the white yarn
R 3: 1 ch, (1 sc, 3 ch) in each stitch around, sl st in 1st ch
Cut and fasten off the yarn.
Attach the skin colored yarn in the center of the back to the back loops of the 32nd row
stitches.
R 33-35: 1 sc in each stitch around (12)
Continue stuffing the body and neck.
Begin crocheting the head.
R 36: 12 inc (24)
R 37: (1 sc, 1 inc) 12 times (36)
R 38: (5 sc, 1 inc) 6 times (42)
R 39: 3 sc, 1 inc, (6 sc, 1 inc) 5 times, 3 sc (48)
R 40-49:48 sc (48)
Take two or three cotton buds and cut off the buds from one end.
Insert the budless ends into the body through the neck into the body stuffing as shown in the
photo below. Go on stuffing the head as you crochet on.
R 50: 3 sc, 1 dec, (6 sc, 1 dec) 5 times, 3 sc (42)
R 51: (5 sc, 1 dec) 6 times (36)
R 52: 2 sc, 1 dec, (4 sc, 1 dec) 5 times, 2 sc (30)
R 53: (3 sc, 1 dec) 6 times (24)
R 54: (2 sc, 1 dec) 6 times (18)
R 55: (1 sc, 1 dec) 6 times (12)
Stuff the head. Pay attention that it is well stuffed and the stuffing is well distributed especially
at the bottom where the cheeks are going to be formed.
R 56: 6 dec (6)
Close the opening, fix the yarn and hide its tails inside the detail.
Ears (2 pieces)
Use a 2mm crochet hook.
R 1: 5 sc in MR, 1 ch, turn your work (5)
Pull the ring and fix the thread.
R 2: 5 sc (5)
Cut off the thread leaving a long tail for sewing.
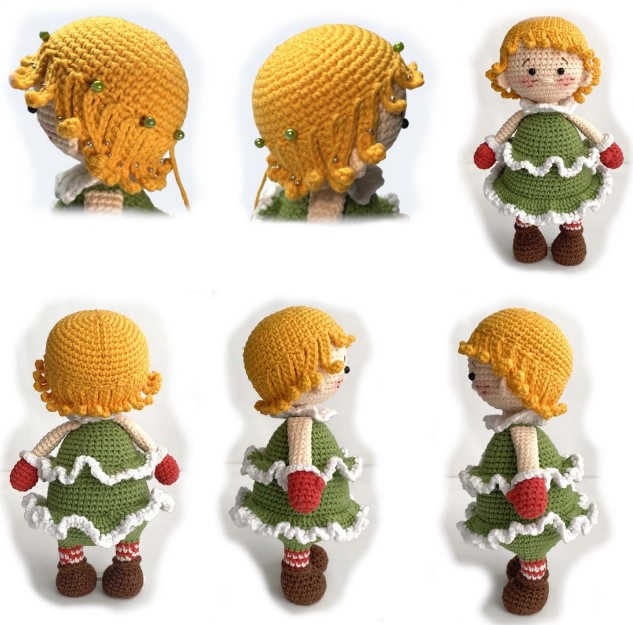
The Wig
Use a 2 mm crochet hook and yellow colored yarn.
Crochet the wig in spiral rounds.
R 1: 6 sc in MR (6)
R 2: 6 inc (12)
R 3: (1 sc, 1 inc) 6 times (18)
R 4: (2 sc, 1 inc) 6 times(24)
R 5: (3 sc, 1 inc) 6 times(30)
R 6: 2 sc, 1 inc, (4 sc, 1 inc) 5 times, 2 sc (36)
R 7: (5 sc, 1 inc) 6 times(42)
R 8: 3 sc, 1 inc, (6 sc, 1 inc) 5 times, 3 sc (48)
R 9-13: 48 sc, 1 sl st in 1st sc (48)
We are going to crochet strands of hair further on.
When crocheting the sc for the strands of hair you are to work sc into the back loop of the chain
stitches.
R 14: (9 ch, starting from the 2 nd st from the hook 8 sc, 1 skip, sl st in next st) repeat 3 times,
then 10 ch, starting from the 2 nd st from the hook 9 sc, 1 skip, sl st in next st, then (11 ch,
starting from the 2 nd st from the hook 10 sc, 1 skip, sl st in next st) repeat 5 times, then 5 ch,
starting from the 2 nd st from the hook 4 sc, 1 skip, sl st in next st, then (6 ch, starting from the
2nd st from the hook 5 sc, 1 skip, sl st in next st) repeat 2 times, 7 ch, starting from the 2nd st
from the hook 6 sc, 1 skip, sl st in next st, then (8 ch, starting from the 2nd st from the hook 7 sc,
1 skip, sl st in next st) repeat 2 times, then (11 ch, starting from the 2nd st from the hook 10 sc, 1
skip, sl st in next st) repeat 5 times, then 10 ch, starting from the 2nd st from the hook 9 sc, 1
skip, sl st in next st, then (9 ch, starting from the 2nd st from the hook 8 sc, 1 skip, sl st in next
st) repeat 3 times, 1 skip, 1 sl st in 1st st.
You are to receive 24 strands.
Fix and cut off the yarn leaving a long tail for sewing
Assembling the toy
Count down 15 rows from the top of the head and mark the place for the nose with pins. The
distance between the pins should be 2 sc.
Start embroidering the nose. Place the stitches over two single crochet until the nose is
protruding a bit. Do not make the stitches too tight – the stitches should be quite accurate and
the tightness of the stitches should be the same for all of them. Only in such a case, the nose is
going to be even. After finishing the nose have the needle exit at the top of the head, fix the
thread well and hide its ends inside the head.
Sew or glue on the eyes now rows up the nose – the distance between the eyes should be 5 sc.
Sew on the ears between the 15th and 18th rows (counting from the last row of the head) seven
sc off the eyes.
Divide the dark brown yarn into threads and use one of them to embroider eyebrows and
freckles.
Embroider the eyebrows and freckles as in the photo below. Put some blusher on the doll’s
cheeks.
Fix the wig to the head with the help of the sewing pins and then sew it on with small sewing
stitches following the edges of the wig.
Place the locks with the help of the sewing pins.
When all the locks are placed to your liking attach them to the head sewing or gluing them on
with the help of the glue gun so that the lock ends are going upward.
That is all!
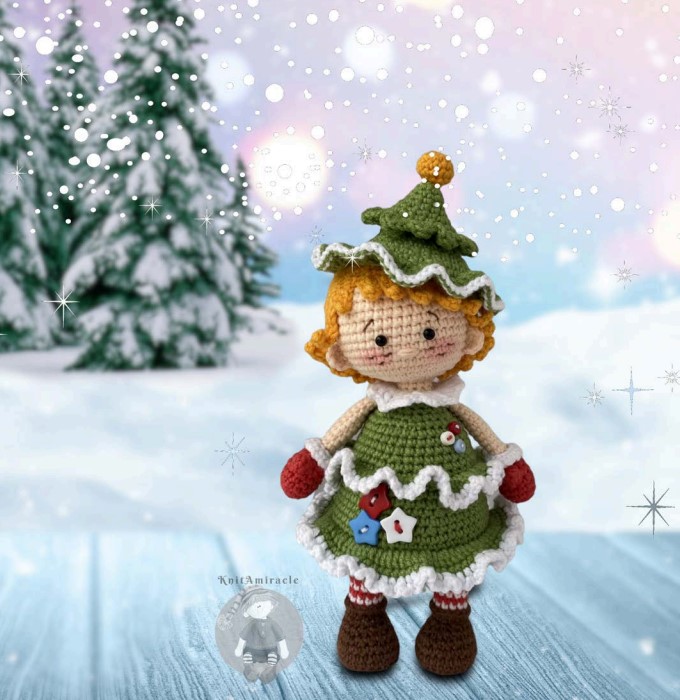
There is only the hat that is still missing.
Hat
The hat is going to be made of two parts.
The upper part of the hat.
Begin with the green colored yarn. Use 2,5 mm hook.
R 1: 6 sc in MR (6)
R 2: (2 sc, 1 inc) 2 times (8)
R 3: (3 sc, 1 inc) 2 times(10)
R 4: 2 sc, 1 inc, 4 sc, 1 inc, 2 sc (12)
R 5: (3 sc, 1 inc) 3 times(15)
R 6: 2 sc, 1 inc, (4 sc, 1 inc) 2 times, 2 sc (18)
R 7: (5 sc, 1 inc) 3 times (21)
R 8: 3 sc, 1 inc, (6 sc, 1 inc) 2 times, 3 sc, sl st in 1st sc (24)
R 9: 3 ch, (1 hdc, 1 sc) into the base of the ch, 1 sl st in next st, (1 sc, 1 hdc, 1 dc, 1 hdc, 1 sc) in one st, 1 sl st in next st Repeat * to * till the end of the row (1 sc, 1 hdc) in into the base of
the 3 ch, sl st in 3rd ch of the round to join.
Cut off and fix the yarn.
Lower part of the hat.
Begin with the green colored yarn. Use 2,5 mm hook.
When making the MR leave a long yarn tail to join the two parts of the hat.
R 1: 6 sc in MR (6)
R 2: (2 sc, 1 inc) 2 times (8)
R 3: (3 sc, 1 inc) 2 times(10)
R 4: 2 sc, 1 inc, 4 sc, 1 inc, 2 sc (12)
R 5: (3 sc, 1 inc) 3 times(15)
R 6: 2 sc, 1 inc, (4 sc, 1 inc) 2 times, 2 sc (18)
R 7: (5 sc, 1 inc) 3 times (21)
R 8: 3 sc, 1 inc, (6 sc, 1 inc) 2 times, 3 sc, sl st in 1st sc (24)
R 9: (7 sc, 1 inc) 3 times (27)
R 10: 4 sc, 1 inc, (8 sc, 1 inc) 2 times, 4 sc (30)
R 11: 2 sc, 1 inc, (4 sc, 1 inc) 5 times, 2 sc (36)
R 12: (5 sc, 1 inc) 6 times (42)
R 13: 3 sc, 1 inc, (6 sc, 1 inc) 5 times, 3 sc, sl st in 1st sc (48)
R 14: into the front loop only: 2 ch, 1 dc into the base of the ch, then 2 dc in each stitch around,
sl st in 2nd ch (96)
Cut off the green colored yarn and attach the white yarn
R 15: into the back loop only: 1 sl st in each stitch around.
Cut off the yarn and make a needle join.
Join the two parts of the hat sewing it together through the pointy tops.
Hat Pompom
Use the 2 mm crochet hook and yellow
colored yarn.
Stuff the detail in the process but not too
tightly – it should be soft.
R 1: 6 sc in MR (6)
R 2: 6 inc (12)
R 3-4: 1 sc in each st (12)
R 5: 6 dec (6)
Close the opening, fix the yarn leaving a long
tail for sewing.
Attach the pompom to the end of the hat.
Attach the hat to the head with the green yarn making several stitches around the head, you do
not need to sew it on tightly to the head.
Sew the decorative star buttons to the dress.
More Amigurumi Doll İdeas