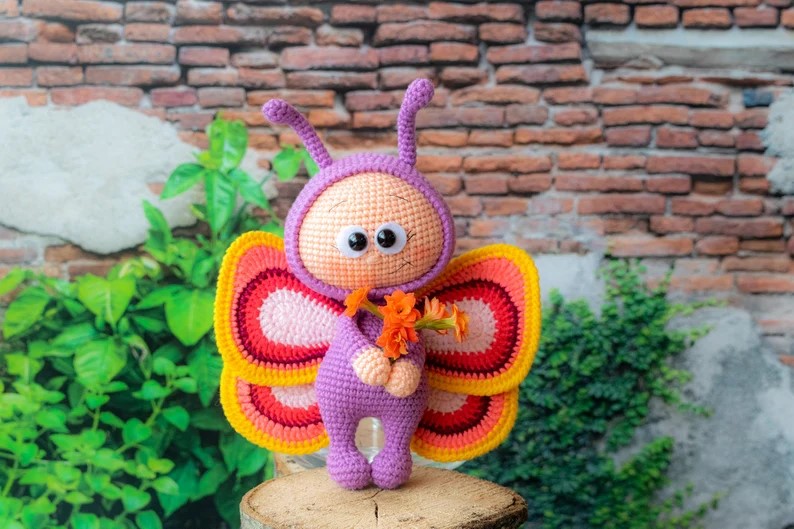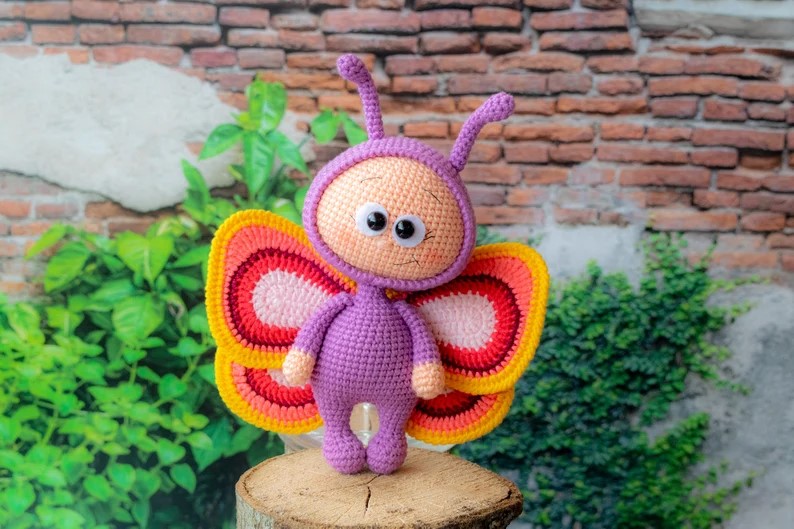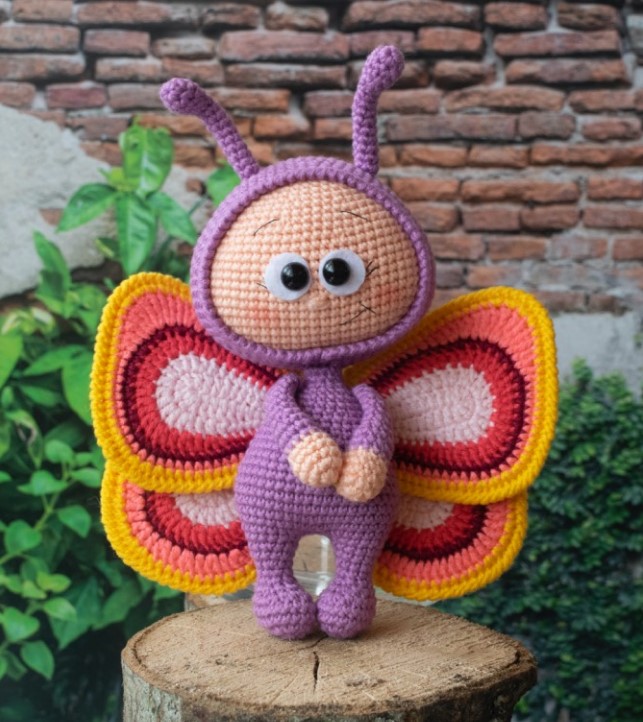
Mini Bonnie in Butterfly Costume Amigurumi Free Pattern
Hello dear visitors, I am here again with new amigurumi molds for you. I am sharing amigurumi patterns for you here for free. You can make your children happy by making these patterns. Amigurumi toys are very popular lately and are the most beautiful toys that don’t harm your kids. Your kids will love them. Let’s move on to our pattern and give them this gift.
MATERIALS
YARN: Gazzal Baby Cotton: 165 meters – 180 yd / 50 grams – 1,76 oz
Colors:
Skin color: 14 gr – color code 3412
Purple: 28 gr – color code 3414
Light Pink: 9 gr – color code 3411
Pink: 10 gr – color code 3460
Dark Pink: 8 gr – color code 3458
Yellow: 14gr – color code 3417
Blue, color code 3451
Claret: 6 gr – color code 3442
Hook: 2,25 mm or a hook size that fits your yarn.
9 mm safety eyes.
Approx 2 cm x 6 cm in size thin white felt for white part of the eyes
Black thread for embroidering mouth and eyebrows.
Approx 20 cm long copper wire / Electrical tape.
Tapestry needle / Polyester fiberfill / Scissors / Glue
Finished toy measures approximately 16 cm if similar materials are used.
ABBREVIATIONS
ch chain
sc single crochet
inc increase- (make two single crochet stitches in the same stitch)
dec decrease- (crochet two stitches together using the decrease
method)
hdc half double crochet
hdc-inc half double crochet increase (make two half double crochet
stitches in the same stitch)
dc double crochet
dc-inc double crochet increase (make two double crochet stitches in the
same stitch)
tr triple (treble) crochet
tr-inc triple crochet increase (make two triple crochet stitches in the
same stitch)
dtr double treble
dtr-inc double treble increase (make two double treble stitches in the
same stitch)
slst slip stitch
(…) – .. times repeat instructions given in parentheses .. times as indicated
= (..) number in parentheses indicates the number of stitches at the
end of the round so you can check your work.
PATTERN FOR FELT PART OF THE EYES
Cut 2 pieces of white felt circles in diameter of 14 mm for 9 mm safety eyes. If the size of
the safety eyes are different, change the size of the felt pieces accordingly
RIGHT FOOT – LEG
Color: Purple
Rnd 1: Ch 5. Start from the 2nd chain from hook (sc in each ch st) – 3 times, sc4 into the
last chain st, turn and continue along the opposite side of the chain, (sc in each ch st) –
twice, sc3 into last ch st (the st we started crocheting the round) = (12)
Rnd 2: Inc, sc2, (inc) – 4 times, sc2, (inc) – 3 times = (20)
Rnd 3 and 4: Sc in each st around = (20)
Rnd 5: Sc 5, (dec) – 4 times, sc5, dec = (15)
Rnd 6: Sc 3, (dec) – 4 times, sc4 = (11)
Rnd 7: Sc 3, (dec) – twice, sc4 = (9)
Rnd 8: Sc in each st around = (9)
Rnd 9: (Sc 2, inc) – 3 times = (12)
Rnd 10: Sc in each st around = (12)
Rnd 11: (Sc 3, inc) – 3 times = (15)
Rnd 12: Sc 5, slst, leave the remaining sts unworked.
Stuff the foot with fiberfill. Continue stuffing as you go.
LEFT FOOT – LEG
Color: Purple
Rnd 1: Ch5. Start from the 2nd chain from hook (sc in each ch st) – 3 times, 4sc into the
last chain st, turn and continue along the opposite side of the chain, (sc in each ch st) –
twice, 3sc into last ch st (the st we started crocheting the round). = (12)
Rnd 2: Inc, sc2, (inc) – 4 times, sc2, (inc) – 3 times = (20)
Rnd 3 and 4: Sc in each st around = (20)
Rnd 5: Sc5, (dec) – 4 times, sc5, dec = (15)
Rnd 6: Sc3, (dec) – 4 times, sc4 = (11)
Rnd 7: Sc3, (dec) – twice, sc4 = (9)
Rnd 8: Sc in each st around = (9)
Rnd 9: (Sc2, inc) – 3 times = (12)
Rnd 10: Sc in each st around = (12)
Rnd 11: (Sc3, inc) – 3 times = (15)
Stuff the foot with fiberfill. Continue stuffing as you go.
Do not cut the yarn and continue crocheting by joining the legs.
BODY
Rnd 12: Sc 10 to the left leg, ch 2, sc into last st of the right leg and join the legs. Sc 14 to
the right leg, sc in each of next 2 sts along the chain, sc5 to the left leg = (32)
Rnd 13: Sc 2, inc, sc5, inc, sc, sc in each of next 2 sts along the chain, sc, inc, sc5, inc, sc5,
inc, sc4, inc, sc3 = (40)
Rnd 14: Sc in each st around = (40)
Rnd 15: Sc3, inc, sc19, inc, sc16 = (42)
Rnd 16 – 18 (3 rounds): Sc in each st around = (42)
Rnd 19: Sc3, dec, sc19, dec, sc16 = (40)
Rnd 20: Sc in each st around = (40)
Rnd 21: Sc3, dec, sc18, dec, sc15 = (38)
Rnd 22: Sc2, dec, sc18, dec, sc14 = (36)
Rnd 23: Sc in each st around = (36)
Rnd 24: (Sc4, dec) – 6 times = (30)
Rnd 25 and 26: Sc in each st around = (30)
Rnd 27: (Sc3, dec) – 6 times = (24)
Rnd 28 and 29: Sc in each st around = (24)
Rnd 30: (Sc2, dec) – 6 times = (18)
Rnd 31: (Sc, dec) – 6 times = (12)
Rnd 32 and 33: Sc in each st around = (12)
Cut the yarn leaving a long yarn tail for sewing.
ARMS
Start with skin color,
Rnd 1: 6sc into the magic ring= (6)
Rnd 2: 2sc in all sts around= (12)
Rnd 3 and 4: Sc in each st around = (12)
Rnd 5: Sc 2, dec, sc4, dec, sc2 = (10)
Change the yarn and continue with purple yarn.
Rnd 6 – 8 (3 rounds): Sc in each st around = (10)
Rnd 9: Sc2, dec, sc3, dec, sc = (8)
Rnd 10 – 15 (6 rounds): Sc in each st around = (8 )
Close the hole using a tapestry needle and fasten off. Cut the yarn leaving a long yarn tail
for sewing. Sew the arms on round 30 of the body
HEAD
We begin crocheting the head from the bottom.The first
round of the head will be the one which we will sew on the
neck section of the body.
With skin color.
Rnd 1: Ch 12. Insert your hook into the 2nd stitch from your hook and make 4sc, (1sc in
each ch stitch) -9 times, 4sc into the last st, do not turn, keep crocheting on the other
side of the chain, (1sc in each ch st) -9 times = (26)
Rnd 2: Sc, (inc) – twice, sc11, (inc) – twice, sc10 = (30)
Rnd 3: Inc, sc, (inc) – twice, sc, inc, sc9, inc, sc, (inc) – twice, sc, inc, sc9 = (38)
Rnd 4: Sc3, inc, sc2, inc, sc15, inc, sc2, inc, sc12 = (42)
Rnd 5: Sc, inc, (sc2, inc) – 3 times, sc11, inc, (sc2, inc) – 3 times, sc10 = (50)
Rnd 6: Sc6, inc, sc2, inc, sc21, inc, sc2, inc, sc15 = (54)
Rnd 7: Sc5, inc, sc3, inc, sc2, inc, sc19, inc, sc3, inc, sc2, inc, sc14 = (60)
Rnd 8 – 11 (4 rounds): Sc in each st around = (60)
Rnd 12: Sc24, ch1 and skip 1st, sc3, ch 1 and skip 1 st, sc31 = (58)
Rnd 13: Sc24, sc in next ch st, sc3, sc in next ch st, sc31 = (60)
Rnd 14 and 15: Sc in each st around = (60)
Rnd 16: (Sc10, dec) – 5 times = (55)
Rnd 17: Sc in each st around = (55)
Rnd 18: Sc4, dec, (sc9, dec) – 4 times, sc5 = (50)
Rnd 19: Sc in each st around = (50)
Rnd 20: (Sc8, dec) – 5 times = (45)
Rnd 21: Sc3, dec, (sc7, dec) – 4 times, sc4 = (40)
Rnd 22: Sc in each st around = (40)
Rnd 23: (Sc6, dec) – 5 times = (35)
Place the safety eyes into the holes in round 12.
Rnd 24: Sc 2, dec, (sc5, dec) – 4 times, sc3 = (30)
Rnd 25: Sc in each st around = (30)
Rnd 26: (Sc 4, dec) – 5 times = (25)
Cut a piece of wire about 20 cm long. Bend one end of the wire but do not bend the
other end. Bind the bent end with a piece of tape. Insert the straight end of the wire
through the middle of the beginning round of the head. The bent end will be in head.
Stuff the head with fiberfill.
Rnd 27: (Sc3, dec) – 5 times = (20)
Rnd 28: (Dec) – 10 times = (sc10) Fasten off. Close the hole using a tapestry needle.
With skin color yarn, embroider the nose on head by centering it between the eyes
Mark the places of the eyebrows and mouth with pins. Embroider eyebrows and mouth
with black thread.
HAT
Color: Purple
Rnd 1: 7sc into the magic ring= (7)
Rnd 2: 2sc in all sts around= (14)
Rnd 3: (Sc, inc) – 7 times = (21)
Rnd 4: (Sc2, inc) – 7 times = (28)
Rnd 5: (Sc3, inc) – 7 times = (35)
Rnd 6: (Sc6, inc) – 5 times = (40)
Rnd 7: (Sc7, inc) – 5 times = (45)
Rnd 8: (Sc8, inc) – 5 times = (50)
Rnd 9: (Sc9, inc) – 5 times = (55)
Rnd 10: (Sc10, inc) – 5 times = (60)
Rnd 11: (Sc11, inc) – 5 times = (65)
Rnd 12 to 17 (6 rounds): Sc in each st around = (65)
Rnd 18: Sc63, ch 1 and skip 1 st, sc = (65)
Rnd 19: Sc63, sc in next ch st, sc = (65)
Rnd 20: Sc in each st around = (65)
Rnd 21: (Sc11, dec) – 5 times = (60)
Rnd 22: Sc in each st around = (60)
Rnd 23: Reverse sc in each st around = (60)
Insert the end of wire which is out of head through the hole in round 18 in the hat
and put the hat on the head properly. Sew the hat onto head carefully.
Bend the end of wire like the one placed in head and bind it with tape. Make sure
the length of remaining wire is not longer than the body length. Insert the wire
into the body and sew the head onto the body. Look at the photos below
BIG WINGS
Wings A-1 and B-1
Color: Light Pink
Rnd 1: Ch10. Start from the 2nd chain from hook 2sc into the st, sc2, hdc 2, dc3, 6dc into
the last chain, turn and continue along the opposite side of the chain, dc3, hdc2, sc2,
2sc into last ch st (the st we started crocheting at the beginning of the round) = (24) Slst
in the first st.
Rnd 2: Ch1, inc, sc5, hdc, dc, (dc inc) – 8 times, dc, hdc, sc5, inc = (34) Slst in the first st.
With Dark Pink yarn
Rnd 3: Ch1, inc, sc6, hdc 2, (dc, dc inc) – 8 times, dc, hdc2, sc6, inc = (44) Slst in the first st.
With Claret yarn
Rnd 4: Ch 1, inc, sc11, (sc, inc) – 10 times, sc11, inc = (56) Slst in the first st.
With Pink Yarn
Rnd 5: Ch 1, inc, sc12, hdc2, dc2, tr2, tr-inc, dtr-inc, tr-inc, tr2, dc2, hdc2, sc27, inc = (61)
Slst in the first st.
With yellow/blue yarn
Rnd 6: Ch 1, sc21, (inc) – 4 times, sc17, (inc) – 3 times, sc16 = (67) Slst in the first st.. Fasten
off.
Wings A-2 and B-2
Color: Light Pink
Rnd 1: Ch10. Start from the 2nd chain from hook 2sc into the st, sc2, hdc 2, dc3, 6dc into
the last chain, turn and continue along the opposite side of the chain, dc3, hdc2, sc2,
2sc into last ch st (the st we started crocheting at the beginning of the round) = (24) Slst
in the first st.
Rnd 2: Ch 1, inc, sc5, hdc, dc, (dc inc) – 8 times, dc, hdc, sc5, inc = (34) Slst in the first st.
With Dark Pink yarn
Rnd 3: Ch 1, inc, sc6, hdc 2, (dc, dc inc) – 8 times, dc, hdc 2, sc5, inc = (44) Slst in the first
st.
With Claret yarn
Rnd 4: Ch 1, inc, sc11, (sc, inc) – 10 times, sc11, inc = (56) Slst in the first st.
With Pink Yarn
Rnd 5: Ch 1, inc, sc 27, hdc 2, dc2, tr2, tr-inc, dtr-inc, tr-inc, tr2, dc2, hdc2, sc12, inc = (61)
Slst in the first st.
With yellow/blue yarn
Rnd 6: Ch 1, sc16, (inc) – 3 times, sc17, (inc) – 4 times, sc21 = (67) Slst in the first st. Fasten
off.
After you finish crocheting the wings, place them on a place as in the picture. The
wings A-1 to B-2 and the wings A-2 to B-1 will be matched each other. Take the
matched wings and join them to each other by crocheting REVERSE SINGLE CROCHET in
each st around them.
SMALL WINGS – 4 Pieces
Color: Light Pink
Rnd 1: Ch 7. Start from the 2nd ch from hook: sc3, hdc2, 6hdc into the last chain st, turn
and continue along the opposite side of the chain, hdc3, sc, sc into last ch st (the st we
started crocheting at the beginning of the round) = (16) Slst in the first st.
Rnd 2: Ch 1, inc, sc2, hdc, (dc inc) – 8 times, hdc2, sc, inc = (26) Slst in the first st.
With Dark Pink yarn
Rnd 3: Ch 1, inc, sc3, hdc2, hdc inc, (dc, dc inc) – 6 times, dc, hdc inc, hdc2, sc2, inc = (36)
Slst in the first st.
With Claret yarn
Rnd 4: Ch 1, inc, sc9, inc, (sc, inc) – 8 times, sc8, inc = (47) Slst in the first st.
With Pink Yarn
Rnd 5: Ch 1, inc, sc10, hdc3, hdc-inc, dc8, 3dc into the same st, dc8, hdc-inc, hdc3, sc10, inc =
(53) Slst in the first st.
With yellow/blue yarn
Rnd 6: Ch 1, inc, sc15, (inc) – twice, sc7, (inc) – 3 times, sc7, (inc) – twice, sc15, inc = (62) Slst
in the first st.. Fasten off.
Small wings consist of 4 same pieces. Match them in pairs and join them to each other by
crocheting REVERSE SINGLE CROCHET in each st around them..
After you join the wings, you can iron them.
Firstly sew on the big wings at the back of the body and then sew on the small wings
ANTENNAS
With Purple Yarn
Rnd 1: 6sc into the magic ring= (6)
Rnd 2: (Sc 2, inc) – twice = (8)
Rnd 3 and 4: Sc in each st around = (8)
Rnd 5: (Sc 2, dec) – twice = (6)
Rnd 6 to 15 (10 rounds): Sc in each st around = (6)
Cut the yarn leaving a long yarn tail for sewing. Stuff the end part of the antenna with
fiberfill. Sew the antennas on hat between the rounds 4 and 5 by counting the rounds
from the last round.
You can use blusher or dry erase crayon for coloring doll’s cheeks.
More Amigurumi Butterfly İdeas